Threaded shafts are critical components in mechanical equipment, and ensuring their machining quality is of utmost importance.
CNC turning precisely machines threaded shafts for accurate fit and reliable transmission.
This paper analyzes an internal threaded shaft and provides CNC process, programming, and simulation reference for similar parts.
Part Analysis
Figure 1 shows the part drawing of the internal threaded shaft, with two sets of surfaces to be machined.
One set is the outer surface, including two outer circular contours, the outer elliptical arc contour at the far right, and the outer thread at the far left.
The two outer circular contours have diameters of 65 mm and 78 mm, and the thread is M27×1.5 mm, 15 mm long.
The other machined surfaces are the inner ones: a conical hole (30–40 mm) and an inner hole (20 mm).
Since both sets of machined surfaces require rotary machining, the machinist selects CNC turning as the machining method for this part.
Manufacturers commonly make threaded shafts from 45 steel, which offers good mechanical properties and low cost, making it suitable for machining shaft parts.
The shaft has a moderate size and rotary shape, making bar stock a suitable blank.
Considering these factors, the designer selects the part’s blank as a Φ80×85 mm 45 steel bar with 207–241 HBS hardness.
After determining the blank, the designer must establish the machining allowance.
First machining the inner hole risks deforming the threaded end and worsening surface finish.
The machinist rotary-cuts the inner and outer surfaces, allowing 1.0 mm for roughing and 0.5 mm for finishing.
Process Route Planning
In CNC machining of threaded shafts, process planning is critical, directly affecting efficiency, accuracy, and quality.
When establishing the process route, the designer must consider the machining sequence and the rationality of the geometric shape.
The internal threaded shaft requires machining of external cylindrical, threaded, internal hole, and external arc surfaces.
Since the blank length and part length differ by only 8 mm, two clamping operations are required during part machining.
Machining the inner hole first positions the threaded end on the outer cylindrical surface, risking part deformation and poor surface finish.
Machine the outer cylindrical surface and threads first, reclamp for the inner hole, then finish the outer cylindrical surface and outer arc.
Figure 2 shows the established mechanical processing process route.

Determination of cutting parameters
The machinist selects cutting parameters for CNC lathes to achieve the desired machining results.
These primarily include cutting speed, feed rate, and depth of cut.
Based on part and machine requirements, the machinist calculates the spindle speed as 800 r/min for roughing and 1,500 r/min for finishing.
vc = πdn/1000 (1)
In the formula: vc is the cutting speed, m · min-1; d is the diameter of the workpiece, mm; n is the spindle speed, r · min-1.
Using equation (1), the machinist can calculate the cutting speed for the main machined surfaces in the process route.
For finishing the outer diameter to Φ55×42 mm with a 0.5 mm allowance per side, the workpiece diameter is 56 mm. At 1,500 r/min, equation (1) gives a cutting speed of 263.9 m/min.
Feed rate refers to the distance the tool moves relative to the workpiece per unit of time.
During rough machining, the machinist prioritizes efficiency, so they should select a higher feed rate.
To ensure surface quality, set the feed rate to 1.0 mm/r for roughing and 0.1 mm/r for finishing.
The depth of cut is the perpendicular thickness of the material removed by the tool, measured in mm.
The formula for calculating the depth of cut for this part is
ap = (dw – dm) / 2 (2)
Where: ap is the depth of cut, mm; dw is the diameter of the unmachined workpiece surface, mm; dm is the diameter of the machined workpiece surface, mm.
For finishing, the machining allowance is 0.5 mm per side. If the machinist completes the machining in two passes, the depth of cut is 0.25 mm.
For rough machining, the mechanical machining allowance is 1 mm per side. If the machinist completes the machining in two passes, the back cutting depth is 0.5 mm.
Mechanical Machining Process Control
The machinist machines the Φ80×85 mm blank on the threaded end, inner hole, and inner hole end’s outer surface and arc.
The workpiece requires two clampings at the blank’s outer surface and threaded end.
When clamping the blank’s outer surface, the machinist can use a conventional three-jaw chuck.
when clamping at the threaded end, since the workpiece is a small part, a clamping device must be used.
Machining the outer cylindrical surface and threads at the threaded end
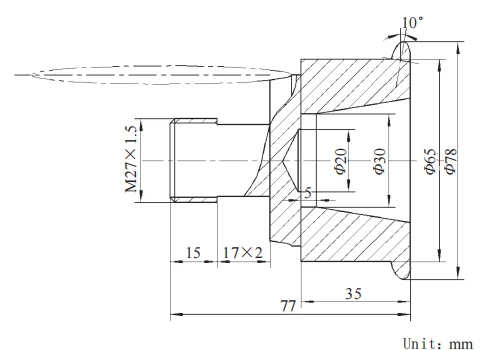
Figure 3 shows the machining diagram for the threaded end. During machining, the machinist clamps the workpiece blank at the left end using a three-jaw chuck.
First, set the spindle speed to 800 r/min, select a 45° offset tool, and turn the end face to a flat surface.
Rough-turn the external diameters to Φ56×42 mm and Φ28×32 mm at 800 r/min, 1 mm/r feed, and 0.5 mm depth using an external turning tool.
Set spindle speed to 1,500 rpm, feed rate to 0.1 mm/rev, cutting depth to 0.25 mm. Finish-turn OD to Φ55 mm × 42 mm and Φ27 mm × 42 mm with an external thread tool.
Then, set the spindle speed to 800 rpm and use a groove cutting tool to turn the retreat groove.
Finally, set the spindle speed to 500 r·min-1, feed rate to 1.5 mm · r-1, and cutting depth to 0.5 mm, and use an external thread turning tool to turn the thread M27 mm×1.5 mm.
Internal Hole Machining
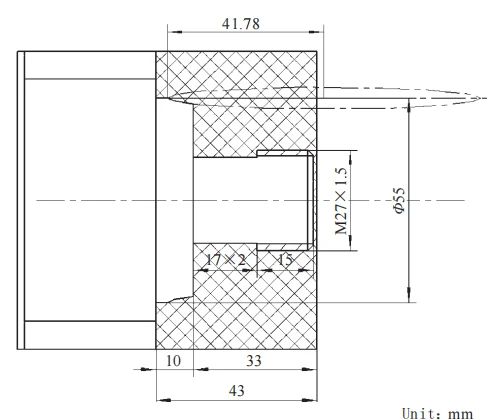
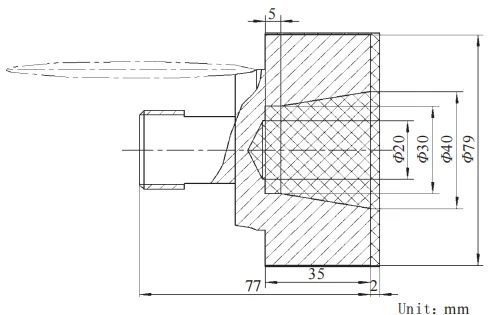
Figure 4 shows the internal hole machining diagram. During machining, the machinist clamps the threaded end with a clamping device.
First, set the spindle speed to 800 r · min-1, set the feed rate to 0.1 mm·r-1, select a Φ20 mm drill bit, drill a Φ20 mm hole, and set the drilling depth to 45 mm.
Set feed rate to 1 mm/min, cutting depth to 0.5 mm, and rough-turn hole to Φ29 mm × 35 mm and internal taper to Φ39 mm × 30 mm with an internal hole tool.
Set spindle speed to 1,500 r/min, feed rate to 0.1 mm/r, cutting depth to 0.25 mm, and finish-turn the hole to Φ30 mm × 35 mm and internal taper to Φ40 mm × 30 mm.
Machining the outer circular surface and outer circular arc of the internal bore
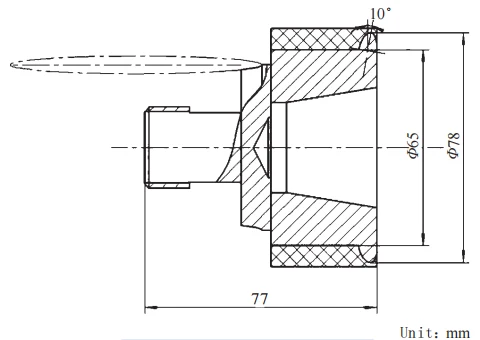
Figure 5 shows the machining diagram for the outer circular surface and outer circular arc.
Set spindle speed to 800 r/min, feed rate to 1 mm/r, cutting depth to 0.5 mm, and rough-turn the outer circular arc with an outer circular turning tool.
Next, keep the parameter settings unchanged and rough-turn the outer circle to Φ66 mm × 55 mm.
Then, set the spindle speed to 1,500 r/min, feed rate to 0.1 mm/r, and cutting depth to 0.25 mm, and finish-turn the outer arc.
Finally, keep the parameter settings unchanged and finish-turn the outer circle to Φ65 mm × 55 mm.
CNC programming and simulation testing
Writing the program and simulating tests can reduce trial cuts, improve accuracy, and achieve “zero defects” in machining.
Compile the CNC machining program and conduct simulation verification using the Swov simulation software.
Open Swagelok software, select M70 to enter simulation, then click X and Z axes to return the machine tool to zero.
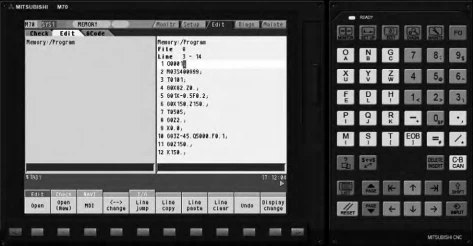
Create a new program, enter the written program in edit mode, as shown in Figure 6.
Next, select the blank and set the blank dimensions to Φ80 mm × 85 mm.
Open the tool library and add tools to positions: external turning (1), slotting (2), external threading (3), internal boring (4), and Φ20 mm drill bit (5).
Set tools, apply compensation, and enter coordinates in the tool parameter row.
Manually run the simulation, trial machine each part, and adjust parameters until results are satisfactory.
In automatic mode, close the machine tool door, press the cycle start button, and complete the simulation machining.
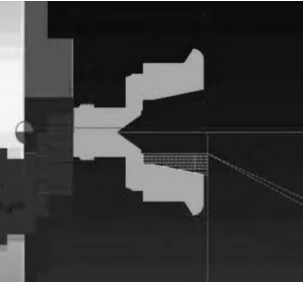
Figure 7 shows the final simulation results, which meet the machining requirements.
Conclusion
This CNC machining process establishes effective methods, including part analysis, design, program development, and simulation.
These steps ensure the machining accuracy and quality of the threaded shaft while improving production efficiency.


