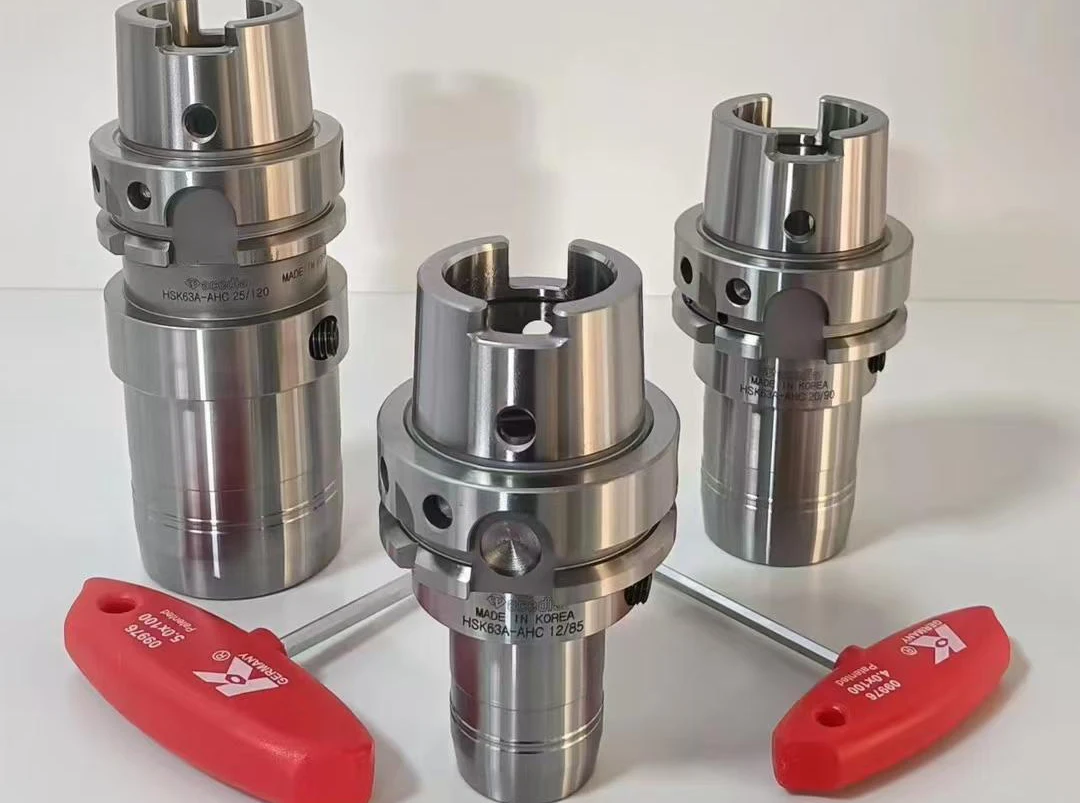
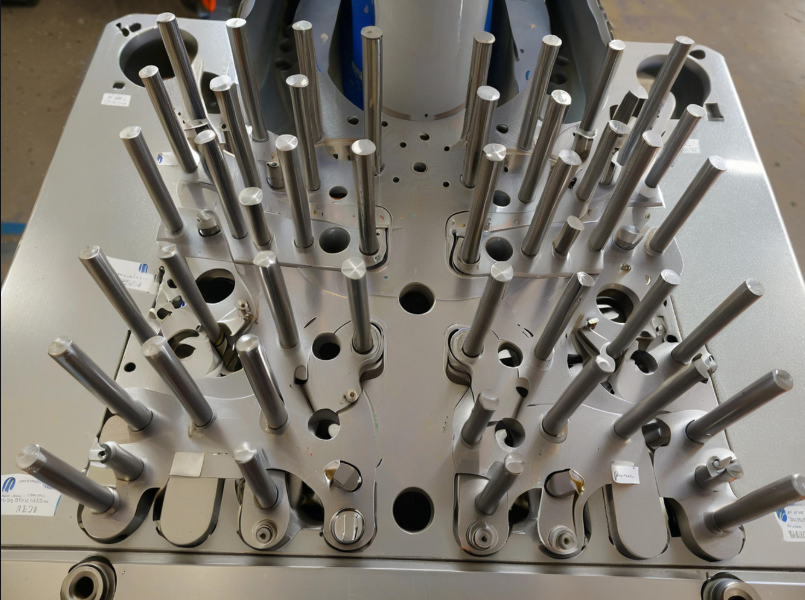
Manufacturers widely apply CNC milling in forming high-precision parts, where surface quality directly impacts part fatigue life, assembly accuracy, and operational reliability.
As manufacturing evolves toward high performance and efficiency, enhancing machined surface quality has become a core process objective.
Components under complex loads, vibrations, and harsh environments require strict surface quality and integrity.
Cutting parameters, tool and material properties, and cooling conditions strongly influence CNC milling surface quality.
Therefore, thoroughly analyzing the mechanisms by which each key factor influences surface quality is crucial for establishing stable and reliable machining processes.
Analysis
Achieving high-quality surfaces in CNC-milled parts depends on multiple interacting factors.
These factors include the characteristics of the cutting tools, the chosen machining parameters, the material properties of the workpiece, and the stability of the machine and fixture system.
Understanding how each factor influences surface formation is essential before analyzing specific contributions from tool geometry and cutting conditions.
Tool Parameters and Cutting Conditions
Tool geometric parameters exert a decisive influence on surface formation mechanisms during milling.
Rake and clearance angles affect chip deformation, evacuation, cutting-zone temperature, and surface roughness.
Excessively large cutting edge radii exacerbate plastic deformation, leading to surface hardening and microcrack formation;
Conversely, excessively small radii may cause edge chipping and induce unstable cutting.
Coated tools improve thermal distribution and friction conditions during cutting, enhancing the consistency and integrity of machined surfaces.
Regarding cutting parameters, spindle speed and feed rate form a strong coupled relationship with surface quality.
High-speed cutting lowers forces but can cause vibration and tool chatter, leading to surface waviness and defects.
Simultaneously, excessive cutting depth increases instantaneous load, potentially causing surface cracking or work hardening.
Engineers must optimize tool parameters and cutting conditions to stabilize machining, control thermal states, and achieve superior surface quality.
Workpiece Material and Machine Tool Conditions
Workpiece material properties and structure strongly affect surface quality; high-hardness alloys cause irregular chip breaks, fluctuating forces, and complex residual stresses.
Non-ferrous metals with high plasticity tend to cause tool adhesion, forming built-up edges and worsening surface roughness.
Material thermal conductivity controls heat buildup; low conductivity causes hot spots, expanding heat-affected zones and altering surface microstructure.
Machine rigidity, spindle stability, and clamping directly affect system dynamics; low rigidity triggers vibration and resonance, destabilizing surface texture.
Minor fluctuations in relative displacement between the tool and workpiece during machining can leave periodic errors on the formed surface.
Engineers must evaluate and control material properties and machine conditions to stabilize machining and ensure consistent surface quality.
Cooling and Lubrication Methods
Cooling and lubrication methods play a decisive role in controlling frictional heat, chip evacuation, and surface lubrication during milling.
While traditional wet cutting can reduce processing temperatures to some extent, it poses issues such as thermal shock and environmental pollution.
In dry cutting environments, tools endure significantly increased thermal loads, making surface quality susceptible to degradation due to thermal stresses.
MQL sprays micro-lubricant to lubricate, cool, reduce tool wear, and enhance surface quality.
High-pressure internal cooling suits high-strength alloys, efficiently evacuating chips and preventing secondary surface scratches.
Additionally, lubricant viscosity, spray angle, and flow velocity directly influence residual stress states and the metallographic structure of the machined layer.
Engineers must select appropriate cooling and lubrication methods to improve tool life, efficiency, and final surface quality.
Process Parameter Optimization and Control Methods
Optimizing CNC milling processes requires a systematic approach that integrates material properties, tool characteristics, and machine dynamics.
Before delving into specific cutting parameter strategies, it is important to understand how these factors collectively influence machining stability, surface quality, and thermal conditions in the cutting zone.
This foundation allows for a structured design of parameter optimization methods tailored to different workpiece materials and operational requirements.
Cutting Parameter Optimization Strategy
Engineers optimize cutting parameters based on material and tool response to control thermal equilibrium in the cutting zone.
During parameter design, spindle speed ranges are prioritized to maintain cutting speeds within the stable machining window corresponding to the material.
Use moderate linear speeds for hard materials to limit heat-affected zones, and higher rotational speeds for ductile materials to reduce adhesion.
Operators set feed rates to maintain stable unit area load, keeping cutting thickness within tool limits and reducing force pulsation.
Cutting depth stays below one-third of workpiece thickness; stratified machining ensures uniform cutting forces.
Create cutting parameter tables for various materials and use the control variable method to build a parameter–thermal flow model for optimization.
To enhance adjustability and on-site adaptability, the parameter system incorporates a dual-variable adjustment mechanism, enabling coordinated feed-speed control.
Figure 1 illustrates the parameter control model for the optimization strategy, presenting the response structure of key variables across the machining range.

Tool Selection and Wear Control
Tool selection employs a multi-tier screening strategy, matching configurations based on material type, required surface quality grade, and tool service life.
Engineers prioritize coated carbide tools (TiAlN or AlCrN, 2.5–3.5 µm) for high-strength steel machining due to their thermal stability and wear resistance.
For soft metal machining, microcrystalline or nanocomposite coated tools are applied to reduce interfacial adhesion effects.
To mitigate tool wear impacts on surface quality, wear monitoring combines periodic inspections with online calibration.
Process checkpoints monitor acoustic emissions and spindle load to assess wear and guide semi-automatic tool replacement.
Tool geometric accuracy is maintained within ±5µm. Edge finishing employs polishing and deburring processes to prevent surface scoring during initial cutting.
Considering reusability, a service life database is established for standardized tools.
Replacement intervals are set based on material properties to enable predictive wear control, ensuring stable tool sharpness within controlled limits.
Coolant Lubrication Process Improvements
The coolant lubrication system employs a hybrid configuration combining centralized control with localized precision spraying.
Cooling channels deliver atomized <15 cSt plant-based oil directly to the cutting edge via nozzles within 5 mm.
MQL with high-frequency pneumatic modulation supplies 0.1–0.2 mL/min oil, reducing hydraulic disturbance and stabilizing the lubrication film.

The system controls coolant temperature within 25±1℃ to prevent thermal shock and tool cracking.
The dual-jet cooling system uses dynamic tracking along the tool path to improve spray precision and response.
System modules monitor coolant flow per cycle to stabilize lubrication, preventing localized heat and interface adhesion.
Machining Path and Stability Control
Machining paths prioritize continuity, uniform load, and minimal entry/exit, with surface partitioning optimizing directions.
Complex contour surfaces employ isochronous cutting to prevent microcrack accumulation caused by repeated loading at path intersections.
Linear segments transitioning to curved surfaces incorporate gradual entry/exit arcs to reduce tool impact during entry and minimize burr formation upon exit.
Path node optimization uses angle weighting to set feed direction and offsets, controlling cutting contact area variation.
Large parts use multi-region path segmentation to reduce thermal deformation and improve thermal equilibrium.
Run finite element simulations before machining to assess spindle rigidity and exclude resonant path segments.
Optimize fixture points with path design to enhance workpiece support, ensuring dynamic stability and surface quality.
Experimental Study and Results Analysis
To evaluate the effectiveness of the proposed CNC milling optimization strategies, a controlled experimental study was designed.
This study focuses on quantifying the effects of key cutting parameters, tool performance, and lubrication methods on surface quality and process stability.
Establishing a systematic experimental framework allows for accurate measurement, comparison, and validation of the optimized machining conditions.
Experimental Design and Methods
Researchers conducted experiments on a VMC850 using medium-carbon steel (grade 45) blanks of 100×60×10 mm in three-axis milling.
A 10 mm TiAlN-coated end mill cut a workpiece secured by a high-rigidity four-jaw chuck, following a high-level contouring path with circular entry/exit segments.
The cooling lubrication system employed minimum quantity lubrication (MQL) using a plant-based synthetic oil, with a spray pressure set at 0.5 MPa.
Researchers set three factors—spindle speed, feed rate, and cutting depth—using a three-level orthogonal design to produce nine test combinations.
Each test run processed a 50mm length, with the central 20mm section designated as the inspection zone to avoid edge effect interference.
Operators recorded spindle load and temperature rise to assess process stability and the effectiveness of optimization.
Surface Quality Inspection
Researchers evaluated surface quality using Ra roughness as the main metric and compared surface profiles quantitatively.
Operators used a three-dimensional surface roughness tester (SJ-410) with a 0.8 mm probe stroke and aligned the measurements with the feed direction.
Operators measured three points on each specimen and calculated the average to determine the final Ra value for each parameter combination.
The workpiece remains stationary during measurement to prevent micro-vibration interference and ensure data stability.
Experiments show parameter combinations strongly influence surface roughness and couple with surface flatness.
Researchers used Table 1 to show Ra measurements and temperature rise for each parameter set, facilitating analysis of surface quality trends.
Verification of Process Optimization Effects
Surface machining results from traditional and optimized parameters were compared under consistent tool batches and machining path configurations.
Researchers conducted unified Ra measurements and microstructure analyses on the test specimens post-machining.
The traditional parameter set produced high surface roughness and dense microcracks in micrographs, indicating insufficient surface layer stability.
The optimized process produced lower roughness, refined microstructure, thinner deformation layers, and more regular tool marks, indicating balanced thermal conditions.
Comparison results show that stabilizing surface quality requires optimizing cutting parameters, controlling tools, and managing lubrication.
Conclusion
A multi-factor system optimized CNC milling surface quality by controlling cutting parameters, tool wear, lubrication, and path stability.
Researchers validated the optimization scheme through experiments, showing improvements in surface roughness, process stability, and integrity.
This study develops parameter control logic and process modeling that apply to CNC milling with diverse materials and structures.
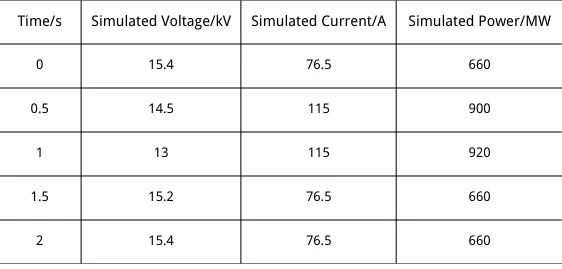
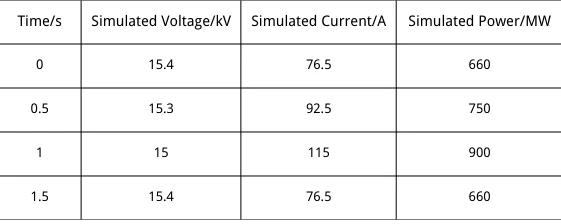
After the short circuit, current peaked within 1 s, and the breaker tripped at 1.5 s, which restored the current to normal.
The short circuit caused voltage and power to fluctuate, and the system restored them to normal once the fault cleared (Table 2).
In overload fault simulations, the circuit was disconnected when the load exceeded 120% as overload protection activated.
During overload, current surged; the breaker tripped at 1.5 s, restoring current and power.
During the overload, current surged within 1 s; the breaker tripped, restoring current to normal (Table 3).
Discussion and Problem Analysis
Analyzing simulation outcomes provides insight into the reliability and predictive capability of the developed thermal power unit model.
Before examining specific accuracy metrics, it is important to understand the scope, assumptions, and potential constraints of the simulation, which influence how results should be interpreted and applied to real-world scenarios.
Accuracy and Limitations of Simulation Results
The simulation shows that voltage, current, and power differ by less than 5%, confirming the model accurately reflects thermal power unit operation.
Researchers note that simulation results are limited, as the model assumes ideal conditions unaffected by temperature fluctuations or grid disturbances.
The simulation modeled short circuits and overloads, reflecting equipment responses but not fully capturing complex system-level failures.
Challenges Encountered During Experiments and Solutions
Engineers face challenges in modeling electrical equipment because parameters vary widely across thermal power plant equipment.
Engineers obtained some equipment parameters from technical personnel and made assumptions for hard-to-get data to ensure the model’s operability.
Computational limits, especially with complex equipment and multi-node faults, reduced simulation accuracy and efficiency.
To enhance simulation efficiency, the model was simplified and partial approximation methods were adopted to reduce computational load.
Conclusion
The experiment validated the simulation model’s effectiveness in equipment operation, fault simulation, and optimization for thermal power plants.
Future research will improve simulation accuracy and reliability by optimizing the model and refining experiments.
FAQ:
Surface quality in CNC milling is influenced by cutting parameters, tool geometry, workpiece material properties, machine stability, and cooling/lubrication methods. Optimizing these factors ensures high precision, reduced defects, and consistent part performance.
Tool rake and clearance angles, edge radius, and coatings like TiAlN or AlCrN directly affect chip deformation, thermal distribution, and friction. Proper tool selection and coating improve surface consistency, reduce microcracks, and enhance machining stability.
Material properties, including hardness, plasticity, and thermal conductivity, influence chip formation, heat accumulation, and tool wear. High-hardness alloys or low-conductivity materials can cause surface microstructural changes and roughness fluctuations if not properly managed.
Spindle stability, machine rigidity, and fixture clamping determine system dynamics. Insufficient rigidity can induce vibrations, resonance, or relative displacement, leading to periodic surface defects and reduced flatness.
Cooling and lubrication, including MQL and high-pressure internal cooling, control cutting-zone temperature, friction, and chip evacuation. Optimized methods prevent thermal shocks, minimize tool wear, and maintain surface uniformity.
Engineers optimize spindle speed, feed rate, and cutting depth based on material response and thermal conditions. Techniques include stratified cutting, unit-area load control, parameter tables, and dual-variable adjustment for feed-speed coordination.
Tool wear is tracked via acoustic emissions, spindle load, and periodic inspections. Predictive replacement, polishing, deburring, and a service life database ensure consistent sharpness and prevent surface degradation.
Continuous paths, isochronous cutting for contours, gradual entry/exit arcs, path segmentation, and finite element simulations minimize thermal deformation, microcrack accumulation, and ensure uniform surface quality.
Experiments use controlled setups, varying spindle speed, feed rate, and cutting depth, with Ra roughness and microstructure analysis as evaluation metrics. Centralized and localized cooling ensure accurate testing of surface quality improvements.
Optimized cutting parameters, tool control, cooling strategies, and path planning enhance surface finish, reduce defects, extend tool life, and stabilize machining. This directly improves assembly accuracy, part fatigue life, and operational reliability.

