Hole machining holds a significant position in metal cutting processes, with deep hole machining being a technically challenging operation in mechanical processing.
Engineers typically classify holes with a length-to-diameter ratio exceeding 10 as deep holes in internal hole machining.
Before the 20th century, deep hole machining was military, later expanding to aerospace, shipbuilding, automotive, and energy.
In large power equipment, the rotor shaft links the generator and turbine, and its performance affects plant safety and stability.
The machining quality requirements for rotor shafts are exceptionally stringent.
Among these, the machining of center blind holes in half-speed rotor shafts falls under deep hole drilling with a high length-to-diameter ratio.
This process demands precise control over hole dimensional accuracy, surface roughness, and positional accuracy.
This paper explores the machining technology for blind holes in large generator rotor shafts.
Analysis of Deep Hole Machining Practices Worldwide
At the start of the 21st century, experts suggested reducing boring bar vibration by lowering cutting stiffness, enhancing component stiffness, and improving system rigidity.
Practice showed that higher clamping rigidity widens the vibration frequency gap and reduces intensity.
Research indicates that spiral grooves in deep-hole boring primarily result from lateral and torsional vibrations during the process.
Increasing guide block length enhances boring stability, demonstrating that within a certain range, longer guide blocks positively reduce vibration.
However, excessively long guide blocks exacerbate torsional vibration.
An expert proposed a three-guide-block BTA tool and compared it to a two-guide-block version using probabilistic methods.
Final tests showed that three-guide-block deep-hole tools had better stability, efficiency, and hole accuracy than two-guide-block tools.
Experts concluded that ultrasonic testing enables real-time monitoring during deep hole machining.
Employing ultrasonic thickness gauges during processing effectively monitors bore wall thickness post-machining.
This detects tool deflection-induced dimensional changes, prevents dimensional deviations, and significantly advances deep hole machining technology.
Experts have designed a novel anti-vibration boring bar integrating collision damping theory and composite laminated material mechanics.
The bar incorporates a vibration-reducing device and a composite laminated structure, effectively minimizing boring bar vibration during deep hole turning.

In summary, deep hole machining research guides vibration reduction and quality improvement.
Product Structure and Process Difficulty Analysis
Introduction to Large Shaft Forgings and Process Design
Figure 1 shows the schematic diagram of a large blind-hole generator shaft manufactured by our company.
During deep-hole machining, the shaft measures over 17 m in length and weighs approximately 200 t.
The center bore dimensions are ⌀240 (+0.4/0) mm, with coaxiality tolerance of ⌀0.4 mm, cylindricity tolerance of 0.3 mm, and surface roughness of Ra 1.6 μm.
During center bore machining, engineers divide the blind hole into a straight section and a spherical bottom section.
Large generator shafts need central testing, using deep-hole reaming tools to ensure specimen accuracy.
The machining process flow for large blind-hole forged shaft components is:
Boring → Straight bore enlargement → Spherical bottom machining and polishing → Straight bore honing → Inspection.
Analysis of Machining Challenges
Deep Hole Machining Methods
Experts categorize deep hole machining into internal and external chip evacuation.
BTA deep hole drilling is an internal chip evacuation technique.
During machining, the workpiece rotates at low speed while the boring bar spins at high speed to achieve optimal cutting speed for the tool.
BTA reaming and boring drills ensure coolant flow to remove chips and heat, improving efficiency and tool life.
promptly removes chips and dissipates heat generated during cutting, enhancing machining efficiency and tool durability.
During BTA reaming, cutting fluid flow inside and outside the boring bar affects its precision and deep hole machining quality.
Operators typically set the cutting fluid pressure to a specific value at the start of deep hole reaming and boring operations.
Increasing machining depth, adjusting cutting fluid pressure utilizes changes in internal and external liquid surfaces.
This affects boring bar stability and helps control finished hole quality.
The author’s company uses external chip-removal deep-hole machining, where the boring bar feeds axially while the spindle rotates the workpiece.
At constant linear velocity, smaller hole diameters require higher spindle speeds.
This method suits deep-hole reaming of lightweight, low-center products, and the machine spindle rotates at high speed to complete reaming.
Vc = πdn/1000 (1)
Deep Hole Tools
The tool design differs based on whether internal or external chip evacuation is employed in deep hole machining.
Particularly for reaming operations, our company frequently employs external chip evacuation reaming.
The tooling system includes a boring head, holder, magazine, and cutting tools for machining center holes of various specifications.
BTA reaming requires reamers for different specifications, ensuring high efficiency but demanding specific center hole dimensions.
Tool System Vibration Damping
Deep hole machining involves boring bars with high length-to-diameter ratios, leading to tool vibration during operation.
Both drilling depth and changes in the boring bar’s natural frequency affect hole quality.
Increased drilling depth and extended boring bar overhang result in more unstable hole machining quality.
In the early 20th century, Taylor studied metal cutting and discovered machining chatter.
Chatter arises from dynamic interactions between the machine, tool, and workpiece, causing extra periodic vibrations.
During deep hole machining, periodic vibrations make cutting depth fluctuate, causing surface irregularities and a wavy pattern.
Furthermore, when subjected to periodic disturbances, the tool experiences varying cutting forces.
This not only accelerates wear on the tool and guide components but may also cause tool chipping and breakage.
Intense alternating vibrations and forces simultaneously increase wear on the machine tool’s damping components.
Machining Plan Development and Challenge Resolution
The large generator shaft studied in this paper is heavy with a high center of rotation exceeding 2 m.
High-speed reaming under heavy load conditions is generally not feasible, hence the selection of BTA deep hole drilling.
Our company selected a heavy-duty deep-hole boring machine with a 5 m swing diameter, 20 m workpiece length, and 500 t load capacity.
Engineers divide the spherical surface at the bottom of the blind hole into roughing and finishing operations.
Engineers use a roughing insert tool for roughing, while they employ a complete form finishing tool for finishing and shaping.
Finally, engineers finish the bore diameter of the straight section using a honing device, which also completes the surface polishing task.
Tooling Design
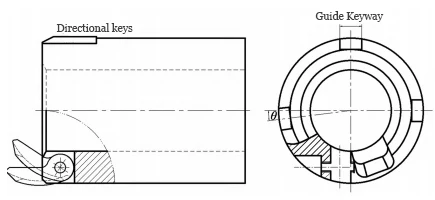
Engineers assemble the BTA tooling from a ⌀130 mm reamer and a cutting tool based on standards and sample requirements.
The reaming tool comprises a tool body, cutting head, and guide keys.
Engineers mount the cutting head on the tool body with a cutting edge swing diameter of ⌀130 mm.
The tool body diameter is slightly smaller than the cutting edge swing diameter.
During reaming, the cutting edge experiences radial, tangential, and axial forces.
The tool body has two guide keys to reduce vibration and improve rigidity: one at 180° and one below at under 90°.
The nesting drill in Figure 2 meets requirements, and operators perform nesting operations using the BTA method.
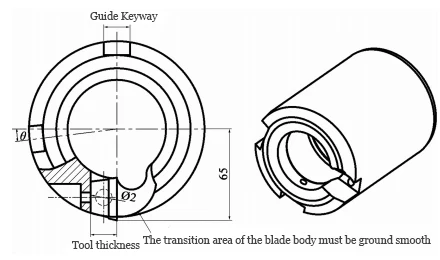
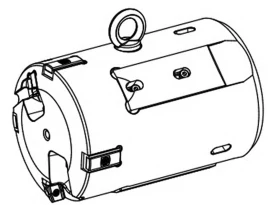
The cutoff tool comprises a cutoff body, cutoff head, and guide keys. The cutoff body diameter matches the nesting tool body diameter.
Engineers incorporate three guide keys, and they position an additional key at the 90° angle above the cutting edge compared to the nesting tool.
The cutting edge of the cutoff head primarily follows an arc surface.
The cutoff tool designed in Figure 3 meets the requirements for sample cutting and extraction.
Reaming Tool Design
After nesting, the inner hole diameter is ⌀130 mm, with a center hole dimension of ⌀240 mm.
Reaming removes excess material to prepare for subsequent finishing of the center hole.
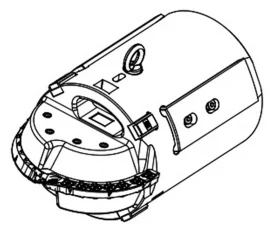
Drawing on our company’s prior BTA deep-hole machining experience, the reaming tool employs inserts with a 19 mm cutting edge width.
Designed for large negative rake angles, it incorporates two sets of cutting edges to increase negative rake.
The inner and outer tool holders form these two sets, mounting the inserts.
Engineers designed multiple reaming tools for different center holes to ensure blind hole quality and high efficiency, as shown in Figure 4.
Bottom-Reaching Tool Design
The central holes in the large shaft forgings studied here are blind holes with spherical bottoms.
Blanking and reaming remove excess material, leaving the blind hole bottom near-flat and ready for spherical machining.
Broadly speaking, bottom-reaching machining falls under the category of reaming.
Designers create tapered reamers like standard ones for roughing, finishing, and precision stages.
Roughing removes stock, finishing controls dimensions, and precision machining polishes the blind spherical hole.
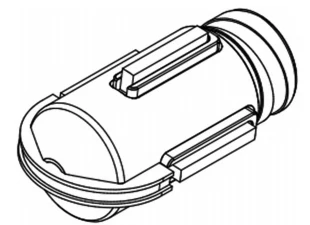
Engineers design specialized tooling for rough bottoming, finish bottoming, and polishing the spherical bottom.
The rough bottoming tool uses asymmetric blade distribution to reduce vibration from large contact surfaces, as shown in Figure 5.
The finishing boring tool ensures final dimensions and surface finish with a complete form design for single-pass machining (Figure 6).
After machining, the blind hole bottom meets dimensional requirements but requires polishing.
Operators wrap the fixture with sandpaper to ensure soft contact and effective polishing (Figure 7).
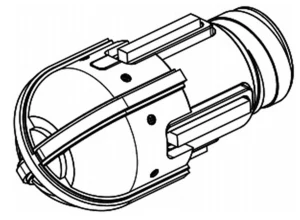
Honing Head Fixture Design
The straight section of the blind hole in the rotating shaft demands high dimensional accuracy and cylindricity.
Engineers designed a dedicated honing fixture to ensure compliance with drawing specifications, as shown in Figure 8.
Honing finishes internal bores using an expandable head fixture to press strips against the surface for proper contact and pressure.
Honing strips rotate and reciprocate under cutting fluid, improving surface quality, stress distribution, and accuracy.
Design of Tool System Vibration Damping
The paper classifies the tool system into the tool and boring bar, and proposes targeted solutions for their roles in BTA deep hole machining.
The proposed solution for tool vibration damping involves alloy guide strips and bakelite backing plates.
Rigid–flexible support enhances dynamic performance under high-frequency vibrations.
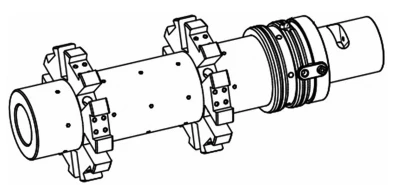
Cone sleeves and adjustable backing plate ensure boring bar vibration damping and hole quality.
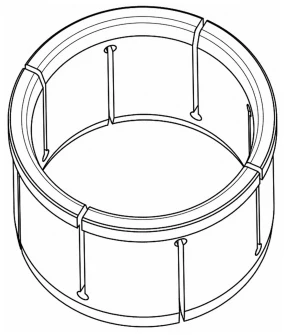
We designed a vibration-damping taper sleeve for blind holes in large generator shafts based on literature and machining experience (Figure 9).
External auxiliary mechanisms suppress vibration by providing radial support to the boring bar, thereby enhancing its rigidity.
Machining Process Control
Reaming Process
During reaming, closely monitor chip morphology, boring bar vibration, and workpiece vibration.
Coordinate with ultrasonic thickness gauges to inspect wall thickness, promptly adjusting or replacing tools and guides.
This minimizes tool edge chipping, tool breakage, guide wear, and cracking caused by alternating cutting forces during center hole machining.
After reaming to the specified dimensions, replace the cutter body with a break-off cutter.
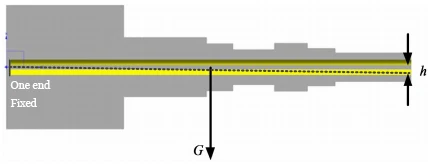
The uncut specimen in the blind hole behaves as a cantilever beam under gravity 𝐺 with maximum drop ℎ at the opening (Figure 10); Operators must position the cut-off tool carefully to prevent jamming.
When the cutting tool enters the center hole, advance slowly for a short distance.
After confirming smooth entry into the sleeve hole, proceed to cut the sample within the hole to complete sampling.
Post-processing, inspect the inner hole condition and remaining allowance after sleeve extraction to prepare for subsequent reaming operations.
Boring Process
As described in Section 3.2, boring removes internal stock and corrects hole eccentricity.
Three reaming stages (⌀130–⌀240 mm) ensure concentricity, with ultrasonic monitoring guiding parameter adjustments.
Machining the Center Hole Bottom
Engineers perform bottom machining after straight section reaming of the center hole using a rough-then-finish approach.
Engineers use rough and finish bottoming tools for the spherical bottom of the center hole.
During rough bottoming, remove as much stock as possible, achieving a length dimension close to the lower tolerance limit.
Finish bottoming requires only a stock allowance slightly below the process allowance requirement.
Engineers select a small feed rate to minimize residual height after each pass, ensuring superior surface finish quality.
The smooth gliding of the tool during finishing lays the foundation for grinding the spherical bottom hole, enhancing grinding efficiency.
Grind the spherical bottom hole with the fixture and sandpaper (Figure 7) to meet drawing specifications.
Honing
Engineers employ honing for finishing after straight-section boring of the center hole.
Honing achieves high dimensional accuracy and cylindricity while producing exceptionally uniform honed surfaces.
This ultimately reduces surface roughness to a level requiring only sandpaper polishing.
Conclusion
We successfully applied this method to large generator shaft forgings, and it also suits blind holes of moderate diameter.
This paper presents a method for machining blind holes in large generator shafts with coaxiality ≤ ⌀0.4 mm, cylindricity ≤0.3 mm, and surface roughness Ra1.6 μm.
Rigid and flexible supports ensured wall thickness met specifications in blind hole machining of the large generator shaft.
FAQ:
Deep hole machining refers to the process of creating holes with a length-to-diameter ratio greater than 10, which presents significant technical challenges. It is crucial in metal cutting for precision components in aerospace, automotive, energy, and power generation equipment.
A blind hole does not pass completely through the material, making it more difficult to machine. In large generator rotor shafts, blind holes require precise control over dimensional accuracy, surface finish, and positional tolerance.
Challenges include tool vibration, maintaining concentricity and cylindricity, removing chips effectively, controlling cutting forces, and ensuring surface finish and dimensional accuracy under heavy loads.
BTA (Boring and Trepanning Association) deep hole drilling uses internal chip evacuation with a rotating workpiece and high-speed boring bar, ensuring optimal cutting speed, chip removal, and heat dissipation. It improves hole quality and tool life.
High length-to-diameter ratio boring bars are prone to vibration, which affects hole quality. Rigid–flexible supports, alloy guide strips, and vibration-damping sleeves enhance dynamic stability, reduce chatter, and maintain dimensional accuracy.
Engineers use ultrasonic thickness gauges for real-time monitoring during reaming and boring. This detects tool deflection and prevents deviations, ensuring wall thickness consistently meets design specifications.
The typical process includes:
Boring
Straight bore enlargement
Spherical bottom machining and polishing
Straight bore honing
Inspection
This sequential approach ensures high precision and surface finish.
Engineers use a rough-then-finish approach with specialized bottoming tools. Roughing removes stock, finishing ensures dimensional accuracy, and honing or sandpaper polishing achieves the desired surface roughness.
Using the described methods, blind holes in large generator shafts can achieve:
Coaxiality ≤ ⌀0.4 mm
Cylindricity ≤ 0.3 mm
Surface roughness Ra 1.6 μm
Yes. While optimized for large generator shaft forgings, the method also suits blind holes of moderate diameter in other heavy-duty or precision components, ensuring high accuracy and surface finish.

