Large thin-wall sleeves are lightweight and cost-effective but have low rigidity and strength, making manufacturing challenging.
Processing thin-wall sleeves often causes dimensional and positional errors, compromising part quality.
Improve large thin-walled sleeve quality by using CNC, advanced equipment, optimized fixtures, and planned procedures.
Structural Characteristics and Challenges of Large-Scale Thin-Wall Sleeve Parts
Large thin-wall sleeves have thin walls, large inner diameters, simple exteriors, and precise internal grooves.
Processing large thin-walled sleeve parts presents certain challenges, primarily manifested in the following aspects:
First, deformation may occur during processing. Sleeves may exhibit varying deformation characteristics under external stress.
Excessive stress causes plastic or elastic deformation, raising cutting-zone temperature and causing thermal deformation.
Second, there are issues with clamping and positioning accuracy during machining.
Thin-walled quenched steel sleeves clamped by three-jaw chuck or internal support risk uneven force, loosening, and accuracy loss.
Force points differ from clamping surfaces on large thin-walled sleeves; turning trapezoidal threads may cause deflection and reduce thread life.
Large sleeves require high coaxiality between the outer cone and inner hole axes, which traditional fixtures cannot ensure.
Working Principle and Design Considerations of Fixtures for Large Thin-Walled Sleeve Parts
Fixture Working Principle
Fixtures are essential for clamping large thin-walled sleeves, with parts placed on V-blocks to ensure accurate radial positioning.
The part’s end face contacts the end face support for axial positioning.
Pressure oil inflates liquid plastic, expanding the elastic thin-walled sleeve inward and outward for uniform, stable clamping.
After machining, the drain valve opens, the liquid plastic deflates, releasing the sleeve for removal.
Key Points in Fixture Design
Engineers should follow these principles when optimizing fixture designs for large thin-walled sleeve parts.
First, ensure uniform clamping force on the sleeve’s inner and outer surfaces to prevent deformation.
Second, choose reliable positioning to ensure accurate fixture and machining alignment.
Third, adhere to the principle of simple structure and convenient operation.
The fixture should be simple, easy to install and remove, aiding operation and boosting efficiency.
Based on the large sleeve structure, centering uses the outer diameter and end face to align the part and fixture axes.
Axial movement is controlled by end face support; liquid plastic centering ensures uniform clamping force on the sleeve.
After selecting clamping method, calculate force using mechanics, hydraulics, and sensors; keep variation within 5%.
During turning, calculate cutting forces and set clamping force for uniformity and efficiency.
Design and Application Cases of Fixtures for Large Thin-Wall Sleeve Parts
Necessity of Optimizing the Design of Push-Out Sleeve Fixtures
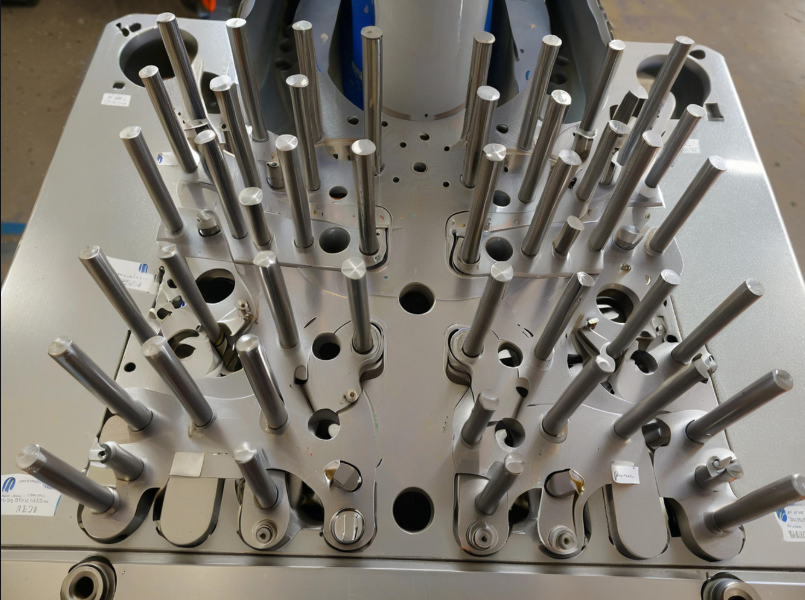
Processing push-out thin-wall sleeves is challenging, typically clamped by a three-jaw chuck or internal support hole (see Figure 1).
Both methods cause deformation, leading to low quality and high rework rates, harming efficiency and increasing costs.
To improve thrust sleeve efficiency, optimize clamping fixture design, develop specialized fixtures, and enhance part accuracy and quality.

Advantages of clamping fixtures for thrust sleeve parts and their design requirements
Push-off sleeve parts lack rigidity, requiring specialized, high-resistance fixtures.
Fixture design must ensure secure, precise, and easily disassembled assemblies.
Therefore, designers must meet these requirements when designing push-off sleeve fixtures.
First, utilize advanced technology to create fixtures that are rigid, strong, lightweight, simple, and easily installed/removed.
Securely mount the workpiece, ensure dimensional accuracy, and prevent deformation.
Design the fixture structure to meet manufacturing, assembly, maintenance, and self-cleaning needs.
Ensure the fixture’s stiffness, stability, and clamping efficiency meet requirements.
Use a honeycomb base and prestressed structure to achieve stiffness with natural frequency above 800 Hz.
Design built-in cooling channels to limit temperature rise below 3°C for thermal stability. Use modular quick-change interfaces for clamping within 10 minutes per piece.
Specialized fixtures for push-off sleeve parts offer the following advantages:
Improving installation precision enables batch processing, prevents errors, and boosts efficiency.
Second, axial clamping reduces deformation and greatly improves workpiece rigidity.
Third, it enables quick clamping, boosting rigidity and cutting efficiency.
Cutting costs, expanding machine tool use, and boosting operational flexibility improve productivity.
It reduces workload, ensures stable clamping, improves the environment, and enhances safety.
Clamping Fixture Structure and Design Considerations for Push-Out Sleeve Parts
The structure of this specialized push-off sleeve fixture consists of two main components: first, the fixture body.
Steel forms the fixture body, which has an outer diameter of approximately 53 cm and a thickness of 2.5 cm.
The fixture’s internal thread matches the inner hole’s trapezoidal thread, easing installation and removal.
Four steel sub-bodies (8×3×2.5 cm) with internal threaded holes are welded to one side of the main body for set screw tightening.
When designing the fixture structure, the role of the internal hexagonal set screws must be clearly defined.
It improves installation efficiency by screwing the workpiece in when rotated;
Tightening set screws then allows greater directional freedom during machining.
Set screws protrude beyond the square pin plane, preventing interference with the cutting tool.
On the other hand, removing the workpiece is more convenient, as it only requires loosening the set screws to unload the workpiece.
Part Processing Process
Operators must clearly define the processing steps when processing parts.
Clamp the blank’s outer diameter securely with a four-jaw chuck, and align the outer diameter and turning end face.
Support a 3.7 cm long center pin with the tailstock and create a retraction groove using the turning thread.
Fully utilize software to program and machine the trapezoidal thread.
Then remove the workpiece, reverse it, and screw it into the internal threads of the fixture. Use an Allen wrench to tighten the screws.
The four-jaw reverse chuck clamps the fixture’s outer surface while the operator turns the workpiece end face to length.
Rough machine taper and hole, then loosen chuck slightly and reduce clamping to avoid deformation during disassembly.
Inspect machined inner and outer diameters for specification compliance, then disassemble.
Ensure secure clamping during machining to prevent loosening and ensure safety.
Use coolants such as kerosene to reduce thermal deformation during turning and improve the surface quality of the machined parts.
All personnel must strictly adhere to production requirements to ensure the quality of part machining.
Key Technology Validation
Designing pusher sleeve fixtures requires validating liquid expansion positioning and clamping force control.
We optimize liquid expansion positioning by modeling contact using pressure, rubber modulus, interference fit, radius, and Poisson’s ratio.
From the perspective of dynamic clamping force control, engineers calculate the maximum axial cutting force by creating a cutting force model.
Application Effect Analysis
Compared to the traditional three-jaw chuck, the proposed fixture shows better performance.
The traditional fixture produces an inner hole roundness of 8.5 μm, outer-inner coaxiality of 0.08 mm, and end face flatness of 0.025 mm.
The specialized fixture developed in this paper achieves an inner hole roundness of 1.2 microns, representing an 85.9% improvement;
Coaxiality improved to 0.015 mm (81.3% better) and end face flatness to 0.01 mm (60% better).
The specialized fixture cuts processing time to 24 minutes, 8 minutes faster than the traditional chuck.
Optimized processes reduce changeover time from 45 minutes in traditional processing to five minutes.
Traditional fixtures cost less, but the specialized fixture boosts efficiency, lowers scrap, and increases annual ROI when production exceeds 5,000 pieces.
Conclusion
In summary, processing large thin-walled sleeves needs specialized fixtures for better efficiency and quality.
Improving fixture technology solves deformation in thin-walled sleeves, ensures precision, reduces operator workload, and boosts economic benefits.
Future fixture design should combine basic principles with smart tech like intelligent hydraulic expansion and low-temp cooling to improve effectiveness.