The rotating sleeve (Figure 1) has an outer contour with undercut, multiple arcs, an M22×1.5 thread, internal bores, and compact dimensions.
All dimensions are set. Only the ϕ24.5mm cylindrical surface requires ±0.1mm tolerance; other outer arcs have no precision requirements.
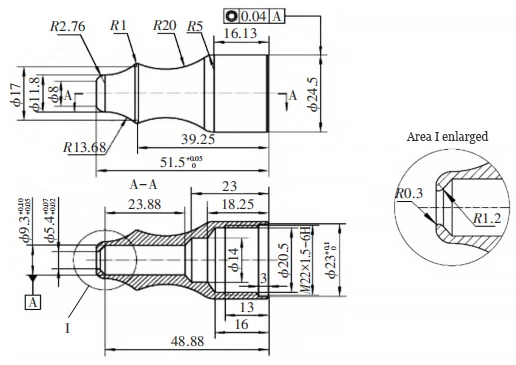
Internal contour machining tolerances include:
– Bore dimension ϕ23mm: zero line plus 10 tolerances
– ϕ5.40mm: plus 2 to plus 7 tolerances
– ϕ9.30mm: plus 5 to plus 10 tolerances The axial dimension 51.5 (total part length) has a zero-line tolerance of +5.0. Additionally, the bore dimensions ϕ9.30mm and ϕ5.40mm must meet a coaxiality requirement of no more than 4.0 from the centerline.
Material: 06Cr19Ni10 (304 stainless steel). The ϕ9.30mm and inner ϕ5.40mm bores share a common reference to ensure coaxiality.
Machining Plan: The design requires considering both the primary and secondary surfaces for this simple part.
The drawing indicates that this rotating sleeve requires turning operations to complete production, which impacts the part’s runout and wobble.
Additionally, the small size of the part significantly increases the difficulty of gauge-checking, tool changes, and the use of soft chucks.
The M22×1.5 mm thread enables precise positioning and eliminates the need for runout checks, tool changes, and soft-jaw fixtures, simplifying machining.
After analyzing the machining strategy, we finalized the production plan as follows:
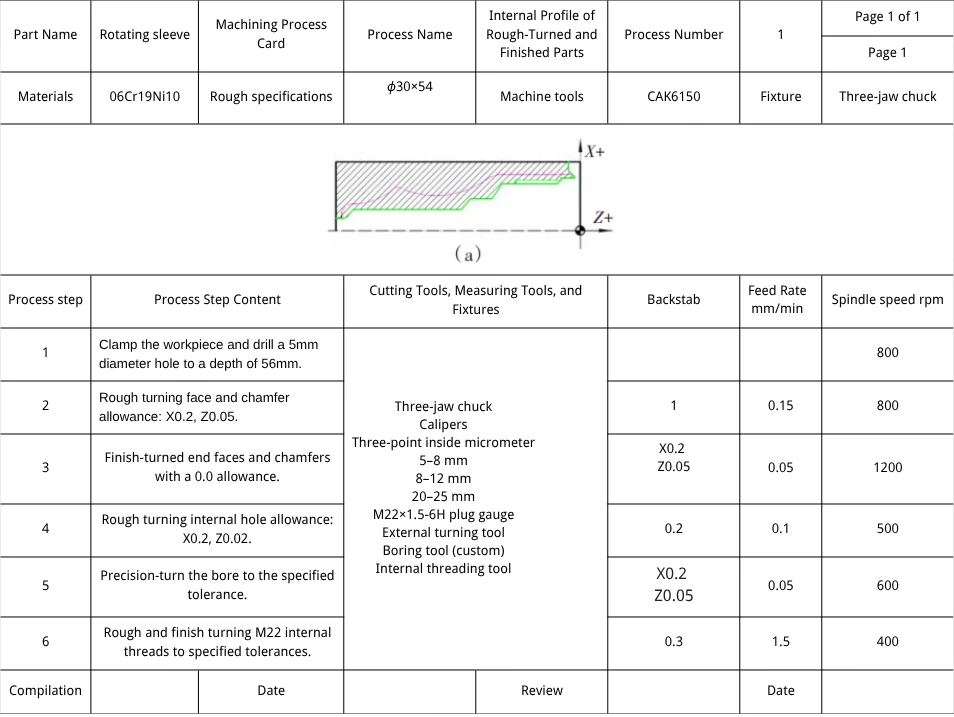
Cut the blank to ϕ30×54mm, machine the inner contour and holes, finish with a custom tool, then cut the internal thread (Figure 2).
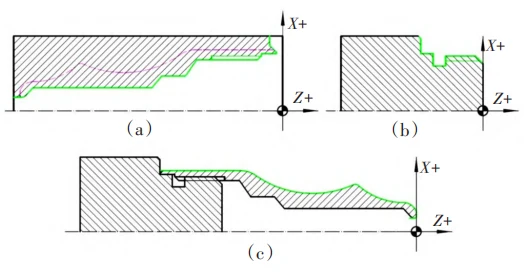
The second sequence requires a turnaround and depends on the first sequence’s internal threads meeting specifications.
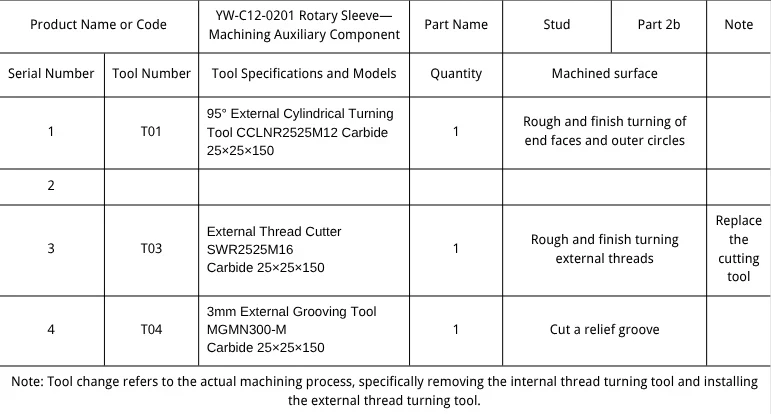
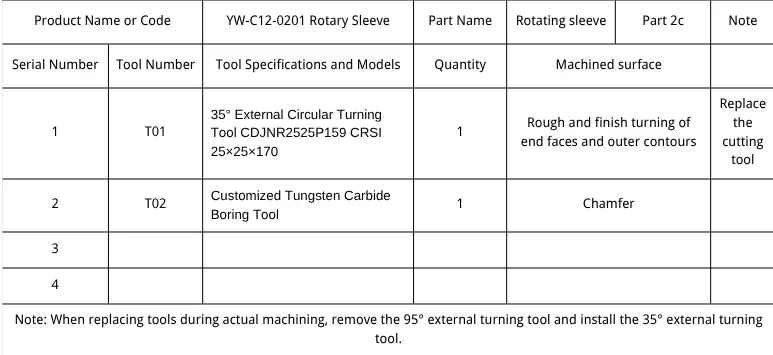
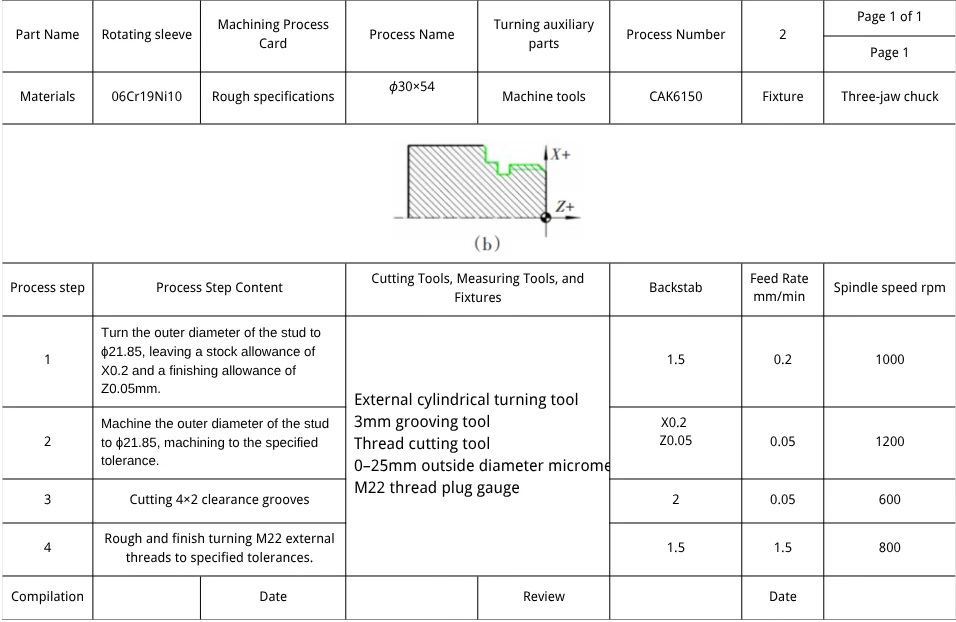
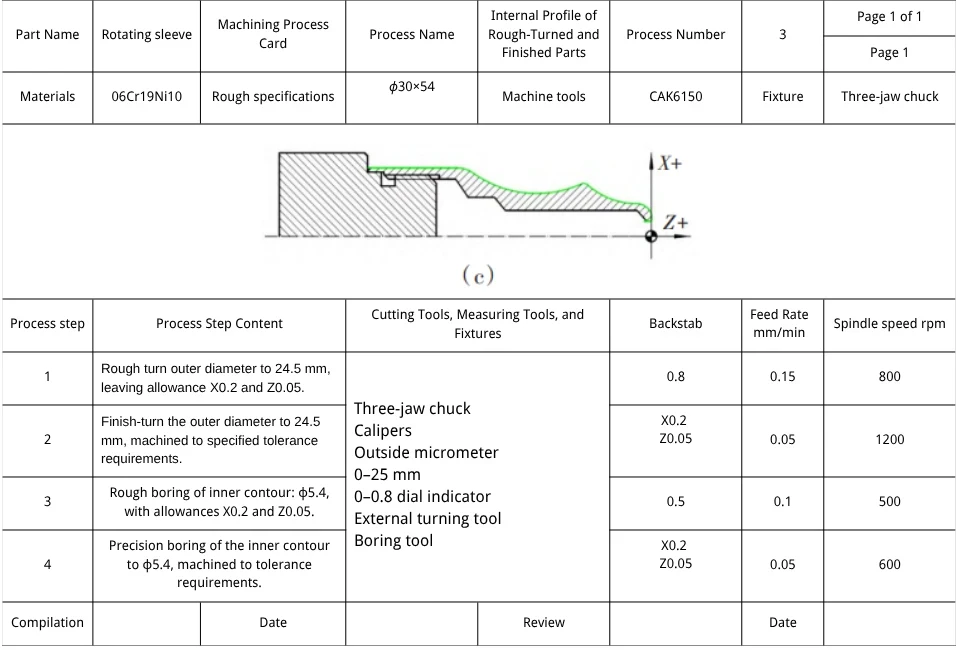
A threaded stud (Figure 2b) sets tools for the second sequence, machining the external contour (Figure 2c) while ensuring coaxiality.
Machine Tool and CNC Selection
A CKA6150 CNC equipped with a Japanese Fanuc system machines the part.
Workpiece Clamping
Common clamping methods include three-jaw and four-jaw chucks. Based on the part’s machining requirements, we chose a three-jaw chuck for clamping.
The clamping procedure is as follows:
First, clamp the workpiece with the three-jaw chuck to machine the inner contour. Remove the part once it meets the required machining accuracy.
With the three-jaw chuck still clamping the workpiece, machine a stud that mates with the internal thread without removing the part. Thread-fit the inner contour and machine the outer contour of the rotating sleeve to meet dimensional accuracy.
Tool Selection
When selecting tools, choose correctly based on machine rigidity, workpiece material properties, machining processes, cutting parameters, and other relevant factors.
Selected tools must exhibit high precision, strength, rigidity, durability, dimensional stability, and ease of installation/adjustment.
Whenever possible, prioritize shorter tool shanks to enhance tool rigidity while meeting machining requirements.
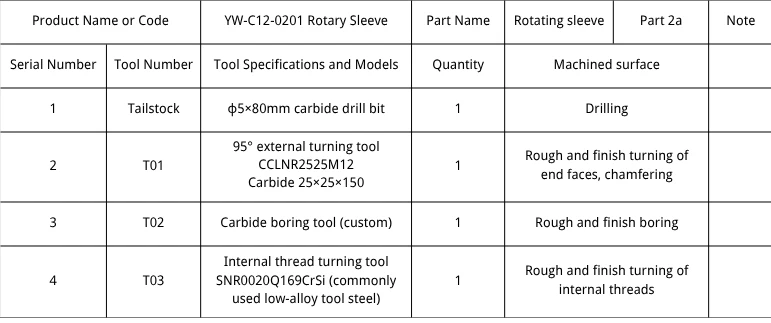
After analyzing tool selection, we chose the following tools for the rotating sleeve part:
– ϕ5×80mm carbide drill bit
– Custom carbide boring tool
– 3mm external grooving tool (MGMN3020) internal thread turning tool (SNR0020Q16), 95° external turning tool (CCLNR2525M12), 3mm external grooving tool (MGMN300-M), external thread turning tool (SWR2525M16), and 35° external turning tool (CDJNR2525P15).
Determination of Workpiece Machining Processes and Their Characteristics
Primary process steps: Cutting → First-stage internal contour roughing/finishing → Stud machining for assembly fixtures → Second-stage external contour roughing/finishing.
- Blanking: Cut a ϕ30×2m bar into ϕ30×54mm blanks with a sawing machine.
- First-stage inner contour roughing and finishing. This process begins by drilling through holes in the ϕ30×54mm blank using a ϕ5mm carbide drill bit.
Step two: Rough and finish turn the inner contour using the proper reference, tools, and parameters to ensure quality.
- Machining of assembly auxiliary features. This step is relatively straightforward within the entire process, comprising three steps:
Rough and finish turning the outer contour using a cylindrical tool to achieve a fit with the internal thread and ϕ23mm bore;
Cutting a relief groove using a grooving tool;
Turning a standard M22×1.5mm external thread using a threading tool.
- Secondary roughing and finishing of the outer contour uses a threaded stud to ensure coaxiality and surface quality (Figure 1).
Machining Process of the Rotational Sleeve
- Machining Process Card. Table 1 shows the machining process card.

- Machining Tool Cards. Tables 2, 3, and 4 show the machining tool cards.
- Machining Operation Cards. Tables 5, 6, and 7 show the machining operation cards.
Program Editing
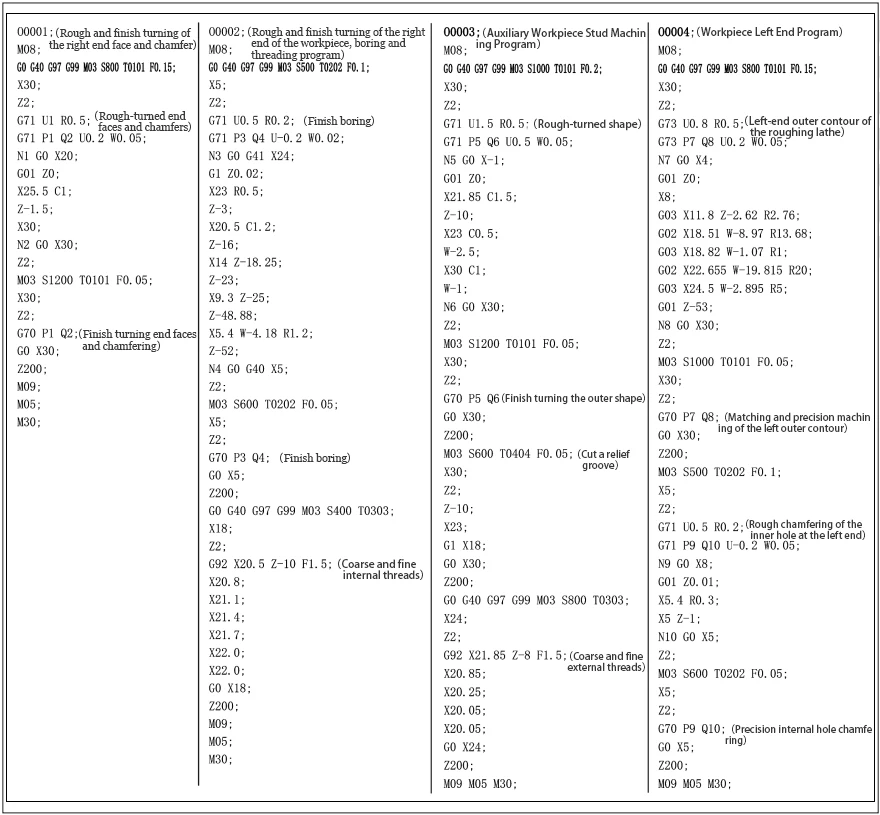
Program editing is shown in Table 8.
Conclusion
Analysis and programming of the YW-C12-0201 sleeve show that careful process planning and programming ensure efficiency and quality.
Process parameters must consider material, machine, tool, environment, operator skill, and external factors affecting accuracy.
FAQ:
What are the key dimensional and tolerance requirements for the rotating sleeve?
The rotating sleeve features an M22×1.5 thread, multiple arcs, internal bores, and compact dimensions. Only the ϕ24.5 mm cylindrical surface requires ±0.1 mm tolerance, while other outer arcs are non-precision. Internal bores have specific tolerances and coaxiality requirements, ensuring high assembly accuracy.
Which material is used for manufacturing the rotating sleeve?
The rotating sleeve is made from 06Cr19Ni10 stainless steel (304 stainless steel), chosen for its corrosion resistance, durability, and machinability under precision requirements.
What is the recommended machining sequence for the rotating sleeve?
The machining sequence begins with cutting the blank to ϕ30×54 mm, followed by inner contour roughing and finishing, stud machining for assembly fixtures, and finally external contour roughing, finishing, and threading using specialized tools.
How does the M22×1.5 mm thread simplify the machining process?
The M22×1.5 mm thread enables precise positioning, eliminating the need for runout checks, soft-jaw fixtures, and frequent tool changes, thereby simplifying the machining and improving accuracy.
Which CNC machine and clamping method are used for the sleeve?
The rotating sleeve is machined on a CKA6150 CNC equipped with a Japanese Fanuc system. A three-jaw chuck is chosen for clamping to balance rigidity, precision, and operational convenience.
What tools are selected for machining the rotating sleeve?
Key tools include a ϕ5×80 mm carbide drill, custom carbide boring tool, grooving tools (3 mm), internal and external thread turning tools, and precision turning tools (35° and 95°). Tool selection emphasizes rigidity, precision, and stability.
How is coaxiality maintained between the inner bores?
The ϕ9.30 mm and ϕ5.40 mm bores share a common reference. Using a threaded stud during the second sequence ensures the external contour remains coaxial with the inner bores within a 4.0 mm tolerance.
What are the primary challenges in machining the rotating sleeve?
Challenges include small part size, complex internal and external contours, undercuts, multiple arcs, and maintaining tight tolerances, all of which complicate gauge-checking, tool changes, and clamping.
How are machining processes planned for efficiency and quality?
Process planning considers material, tool rigidity, machine capability, operator skill, and environmental factors. Sequenced roughing and finishing steps, along with process-specific tooling cards and program editing, ensure high efficiency and precision.
How does the machining process card improve production?
Machining process cards (shown in Tables 1–8) provide a structured workflow for roughing, finishing, and threading. They guide tool usage, sequencing, and program editing, ensuring consistency, accuracy, and repeatability in production.


