Progressive dies shape sheet metal, and a tapping unit can convert die motion into tap rotation for threading holes.
For thicker sheet metal materials, Operators can implement two-step processes—pre-bending followed by bending—to overcome springback during bending.
The punch uses a slanting ejector to prevent bent thread holes from locking and to ensure easy release.
Taking a U-shaped sheet metal part as an example, Engineers designed a progressive die based on the above characteristics.
Part Structure Analysis
The sheet metal part is U-shaped with an internal threaded hole on one side, as shown in Figure 1(a).
Measuring 16 × 12 mm with side bends of 15 mm and 10.5 mm, the part is made from SUS304 with a 3 mm flanged hole, an M5 thread, and a 1.5 mm wall thickness (see Fig. 1b).
Forming Process Analysis
The part needs blanking, punching, flanging, bending, and tapping; a single-stage die reduces efficiency.
Small size and positioning issues lead to high scrap rates, prompting engineers to utilize progressive die forming.
The threaded hole needs a tapping unit, and engineers pre-bend and bend to prevent springback.
After flanging and bending, the formed retaining position prevents normal ejection.
The designer requires a slanting ejector structure to facilitate part removal at the flanged area.
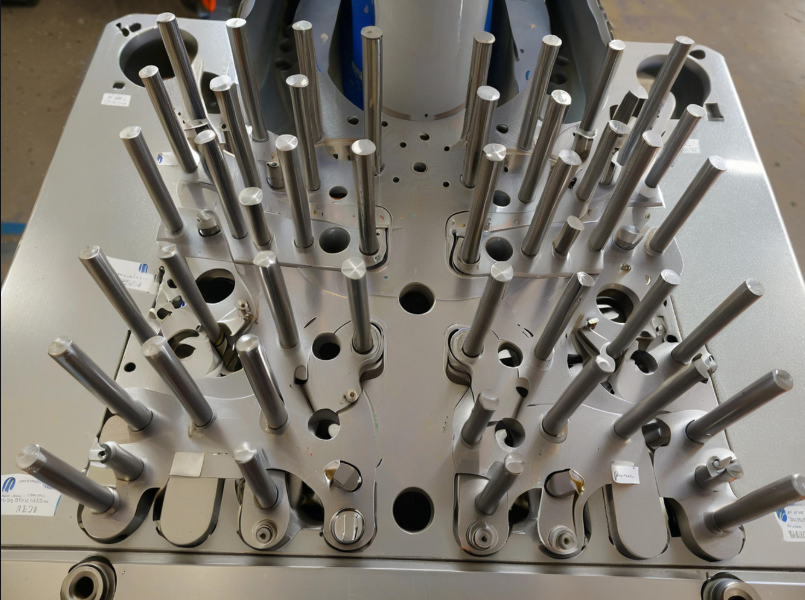
Multiple blanking steps ensure die strength, and engineers arrange 25 operations as shown in Figure 2.
Step ① Punching + Trimming: punch guide and flanged holes, trim strip; holes aid feeding and flanging.
A trimming operation reduces the strip width to 37 mm, the typical scrap width from other products.


Steps ②–③ are idle, so engineers design inserts into the dies during Step ① for the 17 mm pitch.
Engineers use the space of Steps ② and ③ for inserts, designating these steps as idle.
The base hole is countersunk for tapping in ④, while ⑤–⑥ remain idle.
Step ⑦ adds a misfeed detector to alert and pause the press if the countersink or strip is out of specification.
Steps ⑧–⑩ and ⑫–⑯ remain idle; Step ⑪ performs threading using a tapping tool.
Material between adjacent parts is slotted in ⑰, leaving only the strip’s central section.
Steps ⑱–⑲ are idle; Step ⑳ pre-bends thick material 45° to reduce springback and prevent hole interference (Fig. 3).
㉑ remains idle, while ㉒ bends the sheet 90° with an 18° slant punch for smooth hole ejection (Fig. 4).
Steps ㉓–㉔ are idle; Step ㉕ cuts, separating the formed part from the strip and placing it into the collection box.
Tapping Unit Structure Analysis
The part features an internally threaded hole requiring a tapping unit on the progressive die.


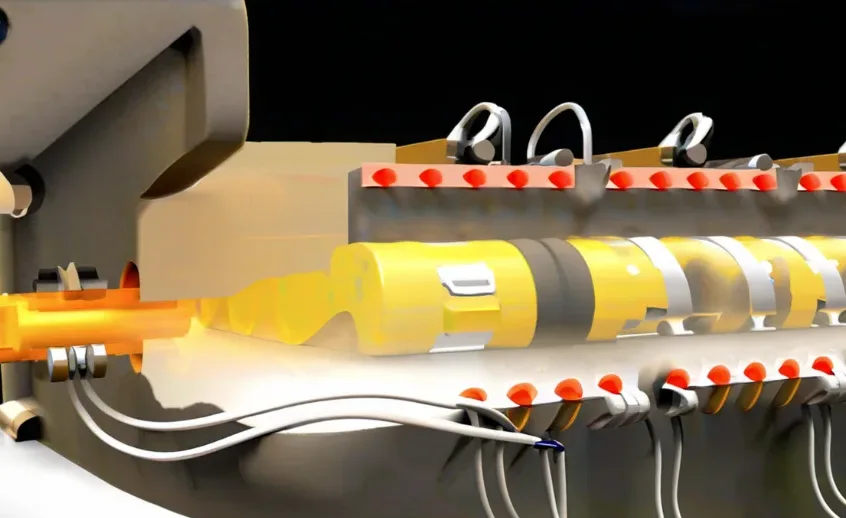
The progressive die’s tapping device converts the upper die’s vertical motion via a screw and gears to rotate the tap (Fig. 5).
Die Structure
A tapping device on the mold converts the upper die’s vertical motion into rotation, enabling internal threading.
The bending punch is inclined to avoid retaining positions from bent holes. The engineers add two shims to the upper die to compensate for the height of the tapping device (Fig. 6).

1. Mold Foot; 2. Lower Mold Base ;3. Lower Mold Spacer; 4. Cavity Die Plate;5. Material Strip; 6. Material Lift Pin; 7. Top Plate; 8. Unloading Plate; 9. Stop Plate; 10. Upper Mold Fixing Plate; 11. Upper Mold Spacer Plate; 12. Spacer plate of the upper mold; 13. Base of the upper mold; 14. Punch Die; 15. Flanging Die; 16. Nitrogen Spring; 17. Tapping Tool; 18.Cutting Die; 19. Pre-bending Die; 20. Bending Die; 21. Limit Screw; 22. Spring; 23. Cutting Die; 24. Tapered Punch Structure.

Conclusion
The engineers install a tapping device in the progressive die based on the U-shaped sheet metal part structure.
The tapping device converts the vertical movement of the upper die into rotational motion, thereby forming internal threads.
For internal thread holes on the bending surface, the stamping sequence involves tapping followed by bending.
To prevent incomplete flanging from die component damage affecting tapping, the engineers install a misfeed detection device before tapping.
Engineers have validated the die through actual production: its structure is rational, and the formed parts meet the requirements.