Error compensation aims to solve a problem in the actual machining process. Various error sources interact in a complex way, reducing the accuracy of the machine tool.
This reduction in accuracy becomes a bottleneck that restricts improvements in machining quality.
The geometric error of the machine tool is an important factor affecting machining accuracy.
It mainly includes the screw pitch error in the machine tool feeding system, nut return gap, and other related issues.
If not effectively compensated, these errors will directly affect the dimensional accuracy and surface quality of machined parts.
Dynamic thermal error
In addition to geometric errors, the dynamic thermal error caused by thermal deformation of the machine tool should also not be ignored..
For example, under the conditions of a spindle speed of 6,000 r/min, a cutting depth of 1.5 mm, and a feed rate of 800 mm/min, the maximum thermal deformation of the spindle front of the CNC milling machine can reach 30 to 40 μm.
Thermal deformation will cause the size and geometry of key functional components to change.
This results in the actual position of the tool tip point deviating from the programmed position, which introduces additional machining errors.
Tool wear
In addition, tool wear during the cutting process affects machining accuracy. Take KC9335 CNC lathe turning 45 steel as an example.
When the tool’s grinding amount reaches 0.2 mm, the machining surface roughness Ra is 2.5 to 3.2 μm, which exceeds the range of IT7 level accuracy..
High-precision CNC Machining Error Compensation Method Design
Method flow
To solve the various types of errors in high-precision CNC machining, a multi-source error compensation method is proposed.
This method is called the Multi-source Error Compensation Method (MECM).
The implementation process of MECM is divided into three steps:
The first step is the geometric error compensation of the machine tool.
Precision measuring equipment, such as a laser interferometer, is used to obtain the machine tool motion error data.
A spatial error model of the machine tool is then established.
Real-time compensation is carried out in the CNC system to eliminate the impact of the geometric error of the machine tool on machining accuracy.
The second step is dynamic thermal error compensation.
Infrared thermal imaging cameras and temperature sensors are used to monitor the thermal deformation of the machine tool in real time.
This is combined with the structural parameters of the machine tool and the mechanism of heat transfer to establish a dynamic thermal error model.
Real-time compensation algorithms are then applied to reduce the machining error caused by thermal deformation.
The third step is tool wear compensation.
This involves using the tool wear online monitoring system to obtain tool wear data.
The appropriate mathematical model of tool wear is selected to predict the impact of tool wear on the machined surface.
Tool wear is then compensated by correcting the tool trajectory.
Method key technology realization
Machine geometry error compensation technology
Machine geometric error compensation technology is the first part of MECM.
It aims to eliminate the influence of geometric errors on machining accuracy, such as positional deviation and angular deviation of machine axes.
The implementation process of this technology is divided into three steps.
Firstly, high precision measuring equipment such as a laser interferometer and electronic level are utilized.
These tools are used to collect the positional, perpendicularity, and linearity errors of each axis in the working space of the machine tool.
Usually, the spacing of measurement sampling points is set at 10-50 mm.
Each sampling point is measured repeatedly 3-5 times, and the average value is taken as the error value of the point.
Second, least squares, spline interpolation, and other mathematical methods are applied to fit a continuous smooth surface of the geometric error of the machine tool.
This leads to the establishment of the machine tool spatial error model.
For example, for a three-axis CNC machine tool, its position error compensation model can be expressed as follows

Where: ∆P is the spatial position compensation of the tool tip; ∆x(x,y,z), ∆y(x,y,z), ∆z(x,y,z) are the position error compensation functions of x, y, and z, respectively, μm.
Finally, the established spatial error model of the machine tool is embedded into the CNC system.
The geometric error of the machine tool is compensated online by real-time correction of the tool path.
The compensation effect is related to the machine model, compensation algorithm, and other factors.
Generally, it can improve the positioning accuracy of the machine tool by 2 to 5 times. For high-end CNC beds, the positioning accuracy after compensation can reach 1 to 3 μm.
The core principle of machine tool geometric error compensation technology is measurement, modeling, and compensation.
This involves obtaining machine tool error data through high-precision measurement.
Accurate mathematical models are then established, and real-time compensation is realized.
The goal is to eliminate the systematic errors introduced by the manufacturing and assembly of the machine tool itself.
Dynamic thermal error compensation technology
The technology is the second key link of MECM.
Its goal is to reduce machining errors caused by thermal deformation during the operation of the machine tool.
The implementation of this technology is divided into three steps.
First step:
It is to select suitable temperature sensors, such as thermocouples, RTDs, etc., and infrared thermal imagers.
Temperature measurement points are then set up in key parts of the machine tool, including the spindle, feed axes, and table, to collect real-time data on the temperature distribution of the machine too.
Usually, the number of temperature measurement points is 10-20, and the sampling frequency is 1-10 Hz.
Second step:
The structural characteristics of the machine tool and the mechanism of thermal deformation are considered.
Using heat transfer theory and finite element analysis methods, a dynamic thermal error model of the machine tool is established.
For example, the axial thermal deformation ∆L of the spindle can be expressed as follows

where: α is the linear expansion coefficient of the spindle material; L0 is the initial length of the spindle; ∆T is the average temperature rise of the spindle.
Third step:
the established dynamic thermal error model is integrated into the CNC system.
The tool trajectory is dynamically corrected by the compensation algorithm based on the real-time measured temperature data.
This enables the online compensation of thermal error.
The compensation effect is influenced by factors such as the type of machine tool and the accuracy of the compensation model.
Generally, it can reduce the machining error caused by thermal error by 60% to 80%.
The core of the dynamic thermal error compensation technology is thermal deformation measurement, modeling, and compensation.
This involves real-time temperature measurement to obtain the temperature field distribution of the machine tool.
By combining the structural parameters of the machine tool and its thermal characteristics, a dynamic thermal error mathematical model is established.
Real-time compensation is then applied in the CNC system to inhibit the impact of thermal deformation on machining accuracy.
Tool wear compensation technology
The third key technology of MECM is tool wear compensation technology.
With the goal of extending tool life and stabilizing machining quality, this technology applies the theories of sensing tests, data analysis, and process control.
It aims to build an intelligent tool wear monitoring and compensation system.
First:
The multi-sensor fusion method is used to monitor tool wear online.
For example, the dynamic signal acquisition and analysis system is used to obtain signals such as cutting force, vibration, and acoustic emission.
From these signals, the average values of cutting force, vibration amplitude, acoustic emission energy, and other wear-related characteristic parameters are extracted ;
The machine vision system is used to capture an image of the tool wear area.
The image processing algorithm is then applied to calculate geometric parameters, such as the wear area and the maximum wear depth (VBmax).
Secondly:
According to the tool material, processing conditions to choose the appropriate wear model, such as the exponential model, the specific calculation formula is

In the formula :
V is the tool wear; Lc is the cutting length; C and k are constants related to the tool material and cutting parameters.
Finally:
the online monitoring data are input into the wear model to predict the remaining tool life in real time.
Based on the prediction results, the cutting parameters, such as cutting speed and feed, are optimized by reducing them.
Alternatively, the dimensional error caused by wear is compensated through fine-tuning of the tool trajectory.
This ensures effective compensation for tool wear.
Method validation
- Experimental Program
In order to verify the effectiveness of MECM, YK7330 CNC milling machine is selected as the experimental platform, and the processing material is No. 45 steel.
The evaluation indexes include the dimensional accuracy δ, surface roughness Ra and roundness error ρ of the machined parts.
δ was measured using a coordinate measuring machine, Ra was measured by a Taylor Hobson roughness meter, and ρ was measured by a roundness meter.
The experiment was divided into two groups:
The uncompensated group and the MECM-compensated group were analyzed.
In the MECM-compensated group, geometric error compensation, dynamic thermal error compensation, and tool wear compensation were implemented sequentially.
The effect of MECM compensation is evaluated by comparing the machining accuracy of the two groups.
- Analysis of Experimental Results
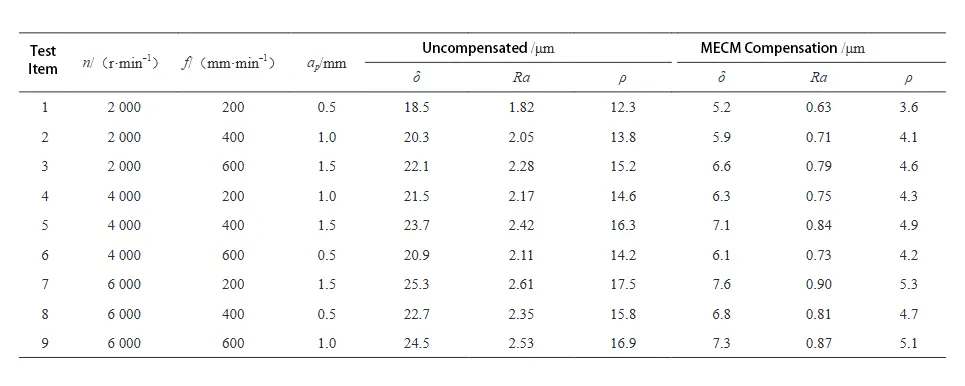
The experimental results are shown in Table 1.

This table comprehensively presents the machining accuracy indexes for both uncompensated and MECM-compensated cases.
The data is provided under different cutting parameters.
Table 1 Comparison of machining accuracy between uncompensated and MECM compensation under different cutting parameters.
As shown in Table 1, the MECM method significantly improves the machining accuracy.
After MECM compensation, the dimensional accuracy δ improved, decreasing from 18.5–25.3 μm to 5.2–7.6 μm.
The surface roughness Ra also improved, reducing from 1.82–2.61 μm to 0.63–0.90 μm.
Additionally, the roundness error ρ decreased from 12.3–17.5 μm to 3.6–5.3 μm.
Results of the two-factor ANOVA
The results of the two-factor ANOVA are shown in Table 2.
The two-way ANOVA revealed that the compensation method had a significant effect on accuracy improvement (F = 238.5, p < 0.001).
The processing parameters also had a significant impact (F = 42.7, p < 0.001).
Additionally, there was a significant interaction between the compensation method and processing parameters (F = 15.3, p < 0.01).

Results of the multivariate regression analysis
The results of the multivariate regression analysis are shown in Table 3.
Within the 95% confidence interval, the improvement effects of MECM on δ, Ra and ρ were 70.6%, 65.5% and 70.2%, respectively.

It should be noted that the compensation effect decreases slightly as cutting parameters increase, especially spindle speed and depth of cut.
This may be because thermal deformation and tool wear become more intense under high-speed and large-depth cutting conditions.
As a result, higher demands are placed on the compensation algorithm.
Conclusion
The MECM proposed in this article has established a complete multi-source error compensation system.
It achieves this by comprehensively considering machine geometry error, dynamic thermal error, and tool wear in high-precision CNC machining.
Through high-precision measurement and mathematical modeling, it achieves real-time error compensation throughout the entire machining process.
This significantly improves machining accuracy and enhances surface quality.
The test results show that the method can improve the dimensional accuracy of typical parts by 70.6%.
It also enhances surface roughness by 65.5% and reduces roundness error by 70.2%. Additionally, the compensation effect is stable and reliable.
FAQ:
Error compensation in CNC machining refers to techniques and methods used to correct errors caused by geometric inaccuracies, thermal deformation, and tool wear. By applying real-time corrections, manufacturers can significantly improve machining precision and surface quality.
Geometric errors, such as screw pitch error, nut backlash, and axis misalignment, directly affect machining accuracy. Compensation technology uses laser interferometers and mathematical models to correct these errors in real time, improving machine tool positioning accuracy by 2–5 times.
Thermal deformation occurs when machine components expand due to heat generated during operation. For instance, a spindle running at 6,000 r/min can deform by 30–40 μm, causing tool path deviation and dimensional inaccuracies. Thermal error compensation helps reduce these effects by 60–80%.
Tool wear increases surface roughness and reduces dimensional accuracy. For example, when tool wear reaches 0.2 mm, roughness can exceed IT7 tolerance levels. Real-time tool wear monitoring and compensation ensure consistent quality and extend tool life.
The Multi-source Error Compensation Method (MECM) is a comprehensive approach that integrates geometric error compensation, thermal error compensation, and tool wear compensation. It provides real-time error correction throughout the machining process, significantly improving dimensional accuracy and surface finish.
Experimental results show that MECM reduces dimensional errors from 18.5–25.3 μm to 5.2–7.6 μm, improves surface roughness from 1.82–2.61 μm to 0.63–0.90 μm, and decreases roundness error from 12.3–17.5 μm to 3.6–5.3 μm. This proves MECM’s effectiveness in high-precision manufacturing.
Geometric error compensation employs laser interferometers, electronic levels, and high-precision measuring equipment. The collected data is processed using mathematical methods like least squares and spline interpolation to build error models, which are embedded into CNC systems for real-time correction.
Dynamic thermal error compensation involves measuring machine temperature with infrared cameras and sensors, building a heat transfer model, and applying compensation algorithms to adjust tool paths in real time. This minimizes the effect of spindle and axis deformation caused by heat.
Tool wear compensation ensures machining stability by predicting tool life and adjusting parameters like cutting speed and feed. It also fine-tunes tool trajectory to correct dimensional errors caused by wear, ultimately improving surface finish and reducing production costs.
MECM has been validated through experiments, showing improvements of 70.6% in dimensional accuracy, 65.5% in surface roughness, and 70.2% in roundness error. These results confirm its reliability and effectiveness in achieving high-precision CNC machining for industries like aerospace, automotive, and mold manufacturing.


