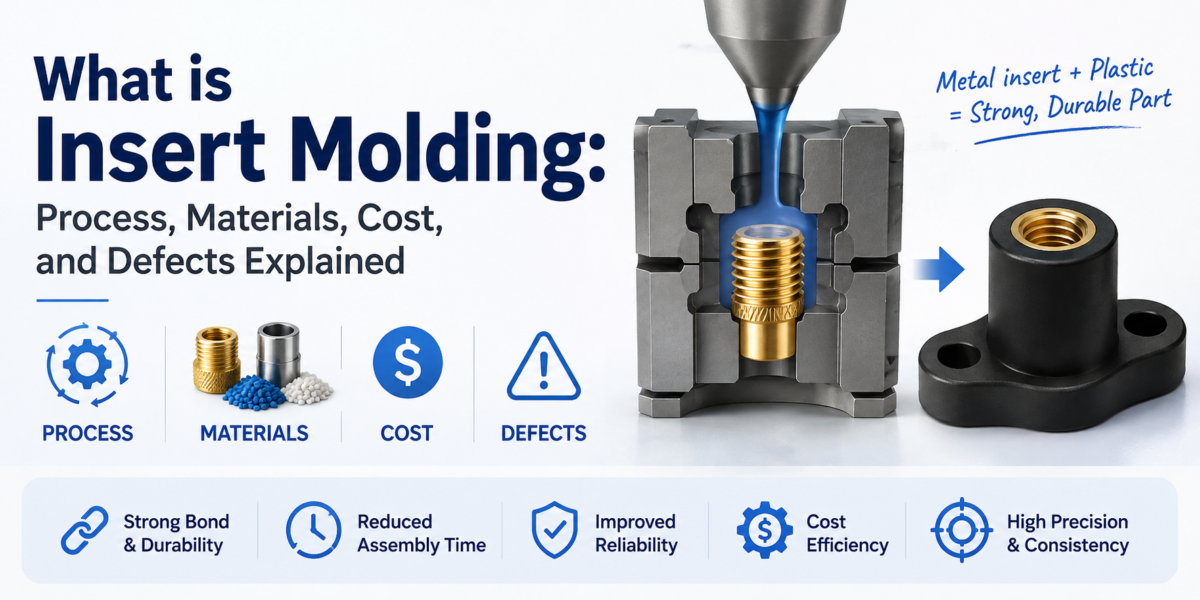
Engineers turn to insert molding when a part needs the strength of metal in a spot that also needs to be plastic, without adding a separate assembly step downstream. Instead of driving screws into a finished housing or ultrasonically welding a threaded boss after the fact, the insert goes into the mold cavity before the plastic shot, so the two materials become one part on the same cycle. If you are sourcing enclosures, connectors, brackets, or any component that needs a metal thread or contact embedded in plastic, the general definition matters less than knowing how the process actually behaves in production, what it costs, where it fails, and how to inspect it before a container of parts leaves the factory.
This guide walks through the process step by step, the materials and inserts used in real production runs, the cost drivers, the defects that show up most often on the shop floor, and how to check a finished part before it ships. It also covers what the last generation of insert molding content tends to leave out: material selection, pricing, defect troubleshooting, and quality control.
| Quick Answer : Insert molding is a single-shot injection molding process where a metal or other insert is placed inside the mold cavity before plastic is injected around it. The resin bonds to the insert as it cools, permanently combining the two materials in one molding cycle instead of a separate assembly step such as heat staking, ultrasonic welding, or manual screw installation. It is most often used to add metal threads, electrical contacts, or structural reinforcement to plastic parts. |
- Key Takeaways
- What Is Insert Molding, Exactly?
- How the Insert Molding Process Works
- Insert Molding Materials: Plastic and Metal Selection
- Common Insert Types and What They Cost
- Insert Molding Design Guidelines (DFM)
- Insert Molding vs. Overmolding
- Advantages and Disadvantages of Insert Molding
- What Drives Insert Molding Cost
- Common Insert Molding Defects and How to Prevent Them
- Quality Inspection for Insert Molded Parts
- Insert Molding for Low-Volume Production and Prototypes
- Applications by Industry
- Choosing an Insert Molding Manufacturing Partner
- Frequently Asked Questions
- Final Words
Key Takeaways
- Insert molding places the insert in the mold before injection, so bonding happens in one cycle instead of a separate assembly step.
- Brass threaded inserts are the most common and lowest-cost option. Custom stamped or machined inserts cost more but suit specialized geometries.
- Boss wall thickness should generally run 0.5 to 1.0 times the insert outer diameter to avoid cracking from hoop stress.
- Tooling costs more upfront than standard injection molding because the mold needs insert retention features, but it removes labor and scrap from downstream assembly.
- The most common defects are insert pull-out, insert shift during injection, flash around the insert, and boss cracking, and each one traces back to a specific, fixable cause.
- Insert molding works for low-volume runs too, using hand-loaded inserts and aluminum tooling to keep upfront cost manageable.
- It suits automotive, medical device, consumer electronics, defense, and aerospace parts where a metal-to-plastic bond has to survive vibration, torque, or repeated use.
What Is Insert Molding, Exactly?
Insert molding sits inside the injection molding family. The “insert” is any component, usually metal but sometimes ceramic or a pre-molded plastic part, that gets placed into the mold cavity before the molten resin arrives. Once the plastic cools and solidifies around it, the insert becomes a permanent, load-bearing part of the finished component. It cannot be removed without destroying the plastic around it.
That is the real difference between insert molding and simply pressing or gluing a metal part into a finished plastic housing after the fact. In insert molding, the plastic actually flows around and locks onto the insert’s surface features while it is still molten, and that detail, bonding happens during the molding cycle rather than after it, is the whole reason the process exists.
Most engineers run into insert molding when they need a threaded hole in a plastic enclosure. Plastic threads strip out after a handful of screw-in, screw-out cycles, or under vibration in the field. A brass insert molded into that same location holds a machine screw reliably for the life of the product.
How the Insert Molding Process Works
The workflow looks close to standard injection molding, with one extra step added at the front.
Step 1: Insert Loading
The insert goes into the mold cavity, held in a fixed position by locating pins, magnets, or a snug-fit pocket machined into the mold steel. Two loading methods are used in production.
Automated (robotic) loading: A 6-axis robot or pick-and-place arm places the insert with repeatable accuracy on every cycle. It is the standard for medium and high-volume programs because it removes operator variation and keeps cycle time consistent, though it adds upfront cost for end-of-arm tooling.
Manual loading: An operator places the insert by hand. This is common for low-volume runs, prototypes, or delicate insert geometry that a robotic gripper would deform. It costs less to set up but introduces more variation between parts and depends on operator consistency.
Step 2: Mold Closing and Injection
The mold closes around the insert and the injection unit shoots molten plastic into the cavity under high pressure, enough to fill every detail of the mold and pack tightly against the insert’s surface. This is also the point where most insert-shift defects happen if the insert is not held firmly enough, since the pressure of the incoming melt can nudge a loosely seated insert out of position.
Step 3: Cooling and Ejection
The mold holds pressure while the plastic cools and shrinks around the insert. Cooling has to be controlled carefully here, because the plastic and the metal insert shrink at very different rates, and that mismatch is the root cause of most cracking defects, which we cover in the defects section below. Once the part is solid, the mold opens and an ejector system pushes the finished part out.
Step 4: Deflashing and Sprue Removal
The molded part comes out attached to a sprue and runner system, plus possibly a thin layer of flash where the insert met the mold’s shut-off surfaces. Both get trimmed off, usually by hand for low-volume runs and with automated deflashing equipment for high-volume ones.
Step 5: Post-Processing
- Heat treatment to relieve internal stress built up during the molding cycle.
- Surface finishing such as painting, printing, or plating for cosmetic or functional requirements.
- Moisture conditioning for materials like nylon (PA), which absorb ambient humidity and change dimensionally as they do.
Insert Molding Materials: Plastic and Metal Selection
This is the part most insert molding guides skip, and it is usually the first real decision an engineer has to make.
Plastic Resin Selection
The resin has to bond well around the insert, tolerate the insert’s thermal expansion during cooling, and hold up to the part’s service environment.
- PA66 (Nylon): High strength and heat resistance, a common choice for automotive under-hood parts and structural brackets. It absorbs moisture, so dimensions can shift slightly in humid climates.
- PBT: Strong dimensional stability and good electrical insulation, frequently used in connectors and electrical housings.
- Polycarbonate (PC): Good impact resistance and optical clarity where needed, common in enclosures and consumer electronics housings.
- POM (Acetal): Low friction and strong fatigue resistance, often specified when the insert is part of a moving mechanism.
- PPS: Handles high temperatures and aggressive chemicals well, common in automotive and industrial parts located near heat sources.
If your assembly also includes CNC machined aluminum brackets or fixtures alongside the molded parts, the material trade-offs follow a similar logic on the metal side. Our aluminum 6061 vs 7075 comparison guide breaks down how strength, machinability, and cost weigh against each other for those parts.
Insert Material Selection
- Brass: The default for threaded inserts. It machines and knurls easily, resists corrosion reasonably well, and costs less than stainless steel. Most off-the-shelf threaded inserts, including self-tapping and press-in styles, are brass.
- Stainless steel: Used where corrosion resistance matters more than cost, such as marine equipment, medical devices, or outdoor products exposed to moisture and salt.
- Aluminum: Chosen when weight is the priority, common in aerospace applications, though it is softer and wears faster under repeated torque than brass or steel.
- Copper alloys: Used for electrical contacts and connector pins, where conductivity matters as much as mechanical retention.
Common Insert Types and What They Cost
Insert hardware cost varies by geometry and how much handling it needs during loading. These are rough per-unit ranges for the insert itself, not the finished molded part, and actual pricing depends on order volume, supplier, and finish.
| Insert Type | Typical Use | Approx. Unit Cost (USD) | Design Note |
| Blind threaded insert (brass) | Enclosures, PCB standoffs | $0.05 – $0.50 | Must seal the thread core so plastic cannot flow into it during injection |
| Through-hole insert | Structural brackets, load-bearing joints | $0.10 – $0.80 | Needs shut-off on both mold sides to prevent flash |
| Knurled / diamond pin | Rotating assemblies, connectors | $0.05 – $0.60 | Knurl depth must resist torque-out without cracking the boss |
| Custom stamped contact | Electronics, medical probes | $0.20 – $5.00+ | Thin geometry deforms easily; usually needs a custom robotic end-of-arm gripper |
Insert Molding Design Guidelines (DFM)
Knurl Design: Preventing Pull-Out and Torque-Out
Smooth metal cannot grip plastic on its own. To stop an insert from spinning or ripping out under load, specify aggressive external geometry, such as diamond knurling or deep helical grooves, on the insert’s outer surface. As the plastic cools and shrinks around those features, it forms a mechanical lock that transfers load from the weaker plastic into the metal insert, which is what gives the part its resistance to shock and vibration.
Boss Wall Thickness: Avoiding Cracks from Hoop Stress
Metal and plastic shrink at different rates as they cool. Because the insert barely shrinks while the surrounding plastic contracts tightly around it, the boss carries a real amount of radial tension, known as hoop stress. A boss wall that is too thin cracks under that tension, sometimes right at ejection and sometimes weeks later in the field.
Design rule: size the boss wall thickness at 0.5x to 1.0x the insert’s outer diameter.
Preheating the insert before robotic loading also helps, since it brings the metal closer to the plastic’s temperature and reduces the shrink-rate mismatch that causes the stress in the first place.
Gate Location and Melt Flow
Position the gate so the melt front does not strike the insert directly, since a direct hit at high pressure is one of the most common causes of insert shift during injection. Flow should wrap around the insert evenly instead of pushing against one side of it.
Venting Near the Insert
Air trapped near an insert causes short shots or burn marks in that specific area. Add venting close to the insert location, especially on inserts with tight tolerances or complex geometry that can trap air pockets during fill.
Insert Tolerance and Mold Shut-Off
The mold’s shut-off surfaces around the insert need to match the insert’s dimensional tolerance closely, or plastic flashes into areas it should not reach, such as a thread bore. This is the same precision discipline that governs standard CNC and molded part tolerancing generally. If you want the fuller breakdown of what different tolerance grades actually mean for cost and lead time, our CNC machining tolerances guide covers that in detail.
Insert Molding vs. Overmolding
These two processes get confused often because both combine more than one material in a single part, but they solve different problems.
| Insert Molding | Overmolding | |
| Purpose | Bond a rigid insert, usually metal, into a plastic part for strength or conductivity | Add a soft or flexible layer over a rigid substrate for grip, seal, or cushioning |
| Process steps | Single shot: insert loaded, then plastic injected around it | Two shots, often two different molds or a rotating mold: substrate molded first, then the second material is molded over it |
| Typical materials | Metal insert plus a rigid engineering resin | Rigid plastic substrate plus a TPE or TPU elastomer |
| Common use case | Threaded bosses, structural brackets, electrical contacts | Ergonomic grips, vibration damping, soft-touch surfaces, watertight seals |
Advantages and Disadvantages of Insert Molding
| Advantages | Disadvantages |
| Eliminates secondary assembly operations like heat staking or screw driving | Higher upfront tooling cost than standard injection molding |
| Stronger, more permanent bond than press-fit or adhesive assembly | Insert placement adds cycle time and process complexity |
| Fewer parts and fasteners to manage in the bill of materials | Insert material and resin need to be thermally and mechanically compatible |
| More consistent quality at volume versus manual assembly | Design changes after tooling is cut are expensive to make |
| Can lower total unit cost at scale despite the higher tooling investment | Requires tighter process control than standard molding to avoid insert-related defects |
What Drives Insert Molding Cost
Insert molding almost always costs more upfront than a standard plastic part, and less over the life of a program that would otherwise need manual assembly. The main cost drivers are:
Tooling complexity: The mold needs insert retention features, locating pins, and tight shut-off tolerances around the insert location, all of which add machining time and cost compared to a standard mold cavity.
Insert unit cost and loading method: Off-the-shelf brass inserts are inexpensive, while custom stamped or machined contacts cost significantly more. Robotic loading raises upfront tooling investment but lowers per-part labor cost at volume; manual loading is the reverse.
Cycle time: Loading an insert, whether by robot or by hand, adds seconds to each cycle compared to standard molding, which affects the per-part cost at high volume.
Insert preheating: Preheating reduces defects but adds an extra process step and equipment cost.
Order volume: Tooling cost amortizes across the run, so insert molding tends to make the most financial sense above a few thousand units, though low-volume approaches exist too (see below).
Resin choice and secondary finishing: Engineering resins like PPS or glass-filled nylon cost more per kilogram than commodity plastics, and any painting, plating, or printing adds a per-part cost on top.
Because these variables interact, the only reliable way to get an accurate number for a specific part is to quote it against your actual drawing and volume. Our CNC machining cost calculator gives a fast starting estimate for machined components in the same assembly, and our team can quote the molded insert parts alongside it.
Common Insert Molding Defects and How to Prevent Them
| Defect | Likely Cause | Fix |
| Insert pull-out / torque-out | Insufficient knurl depth or undersized boss | Increase knurl depth, add flats, resize the boss per the 0.5x-1.0x OD rule |
| Insert shift during injection | Loose seating in the mold, or gate aimed directly at the insert | Tighten locating pins, reposition the gate, reduce injection speed near the insert |
| Flash around the insert | Worn or mismatched mold shut-off surfaces | Re-machine the shut-off, replace worn mold steel, verify insert tolerance |
| Boss cracking (hoop stress) | Boss wall too thin relative to insert diameter, or insert not preheated | Apply the 0.5x-1.0x OD wall rule, preheat inserts before loading |
| Insert corrosion before molding | Improper storage or bare-hand handling before loading | Use proper storage, gloves, or ultrasonic cleaning prior to loading |
| Short shot near the insert | Insert blocking flow path or insufficient venting | Redesign the gate and runner, add venting near the insert location |
| Did You Know? A single loose locating pin in the mold, worn down by only a fraction of a millimeter, is one of the most common root causes of insert shift on the factory floor. It rarely shows up in a visual check and usually gets caught only through dimensional or X-ray inspection. |
Quality Inspection for Insert Molded Parts
- Dimensional inspection with a CMM to confirm insert position against drawing tolerance.
- Pull-out or torque testing to confirm insert retention meets the specified holding force.
- Visual and magnified inspection for flash, sink marks, and surface defects around the insert boss.
- X-ray or CT scanning to verify the insert sits centered inside the part and has not shifted internally.
- Salt spray or humidity testing for insert corrosion resistance, where the application calls for it.
- A First Article Inspection (FAI) report before the full production run starts, so any issue gets caught on a handful of parts instead of a full container.
Insert Molding for Low-Volume Production and Prototypes
Insert molding is often assumed to be a high-volume-only process because of the tooling investment, but low-volume paths exist and get used regularly for prototypes and bridge production.
- Aluminum tooling instead of hardened steel cuts mold cost significantly and is durable enough for a few hundred to a few thousand shots.
- Hand-loaded inserts remove the need to invest in robotic end-of-arm tooling before a design is finalized.
- Testing form and fit with a 3D printed housing and a placeholder insert before committing to a steel mold catches design issues early and cheaply.
- Bridge tooling lets a program run an initial low-volume batch on an aluminum tool while the hardened steel production tool is still being built, so a product launch is not held up waiting on tooling.
Applications by Industry
Automotive: Sensor housings, connector blocks, and under-hood brackets that need a metal thread to survive vibration and repeated servicing.
Medical devices: Surgical handle grips, diagnostic device housings, and dental tool components that need a durable metal-to-plastic bond and, in many cases, sterilization compatibility.
Consumer electronics: Charging port housings, adjustment knobs, and control panel overlays where fasteners need to hold up over years of use.
Aerospace: Cabin interior latches and seating hardware, where weight reduction from plastic still needs a metal thread for structural attachment points.
Defense: Communication equipment housings and hardware components that need to be lightweight, cost-effective, and reliable under field conditions.
Choosing an Insert Molding Manufacturing Partner
The partner you work with has more influence on yield and consistency than almost any other variable in the process. A few things worth checking before you commit a program to a supplier:
- Robotic loading capability, not just manual insertion, if your volume justifies the consistency it provides.
- In-house mold-making rather than outsourced tooling, which shortens the feedback loop when a shut-off surface needs adjusting.
- Documented material sourcing for both the resin and the metal inserts.
- A First Article Inspection process before full production, not just a final inspection at shipping.
- DFM support before steel gets cut, so boss thickness, knurl design, and gate placement get reviewed while changes are still cheap.
At Ruiyi, insert molding programs run through our own tooling shop and injection molding floor, backed by ISO 9001:2015 and ISO 13485 certification, so the same team that machines the insert can also cut the mold and mold the finished part without handing the program between separate vendors. Every order also runs under our Zero-Risk Assurance Policy, meaning production and shipping happen first and payment is confirmed only after you have inspected the parts.
You can see examples of finished molded and machined parts in our custom plastic parts case gallery, and our full tooling capability on the mold-making services page.
| Expert Insight Most insert molding failures we get asked to troubleshoot trace back to the boss wall thickness or the knurl design, not the injection parameters. If a customer’s part keeps cracking or the insert keeps spinning out, we check the geometry against the 0.5x-1.0x OD rule before we look at anything else on the molding floor. Getting that ratio right the first time, before steel is cut, avoids almost every rework cycle we see. Solomen Yang, Manufacturing Industry Expert, Ruiyi CNC Machining |
Frequently Asked Questions
What is insert molding?
Insert molding is an injection molding process where a metal or other insert is placed inside the mold cavity before plastic is injected around it. The plastic bonds permanently to the insert as it cools, combining both materials in a single molding cycle.
How much does insert molding cost?
Cost depends on tooling complexity, insert type, loading method, and order volume. Off-the-shelf brass inserts cost roughly $0.05 to $0.50 each, while custom stamped or machined inserts can run several dollars apiece. Tooling for insert molding also costs more upfront than a standard injection mold, though it typically pays back through eliminated assembly labor at volume.
What is the difference between insert molding and overmolding?
Insert molding bonds a rigid insert, usually metal, into a plastic part in a single shot, mainly for strength or conductivity. Overmolding is a two-shot process that adds a soft, flexible material over a rigid substrate, mainly for grip, cushioning, or sealing.
What materials work best for insert molding?
PA66, PBT, polycarbonate, POM, and PPS are the most common plastic resins, chosen based on strength, heat resistance, and chemical exposure requirements. Brass is the most common insert material, with stainless steel and aluminum used where corrosion resistance or weight savings matter more.
What are the most common insert molding defects?
Insert pull-out, insert shift during injection, flash around the insert, and boss cracking from hoop stress are the defects that show up most often, and each one has a specific, identifiable cause rooted in either the mold design or the insert loading process.
Can insert molding be used for low-volume production?
Yes. Aluminum tooling and hand-loaded inserts keep upfront cost manageable for prototypes and bridge production, and a program can move to steel tooling and robotic loading once volume justifies the investment.
What tolerance can insert molding achieve?
Tight-tolerance insert molding programs commonly hold insert position within a few hundredths of a millimeter, though the achievable tolerance depends on mold shut-off precision and insert dimensional consistency. This follows the same tolerance principles used in precision CNC machining more broadly.
Final Words
Insert molding earns its higher tooling cost by removing an entire assembly step from your production line, but only when the boss geometry, insert selection, and loading process are specified correctly from the start. Most of the defects covered in this guide are avoidable with the right design review before steel gets cut, not fixed after the fact on the molding floor.
If you are evaluating insert molding for a new part, our engineering team can review your design for boss thickness, insert compatibility, and gate placement before tooling starts. Get in touch with our team for a DFM review and a quote.